Happy Tuesday! I had to take my son to the doctor yesterday (pink eye, ear infection, generally gnarliness), and she remarked that he has a birthday coming up. I said, "yes, in a couple of weeks." She replied, "it's next week." Oops! Yes, I really do know what day my son was born (since I was there). I blame it on the fact that the month is flying by. LOL!
My card today is all digi. Torico (one of the illustrators for There She Goes stamps) offered a free pear stamp on her blog, and I paired it with a chevron digital brush from Rhonna Farrer to make this non-traditional baby card:
In the original digi, the "girl" pear was much smaller than the "boy" pear. To make the pears more uniform, I printed out the pears twice, enlarging them the second time. Then, I fussy cut the pears and used the larger "girl" and the smaller "boy." I popped up both with foam tape, and I layered the yellow one on top of the green one.
At first, I used watercolor pencils, but didn't like how it looked, so I went over it with Copics. Live and learn! For the base, I stamped the chevrons and added my own sentiment.
Since I don't know anyone having twins, let alone a boy and a girl, I'm afraid this card will be collecting dust in my craft room for a while. Anyone having twins?
Have a great day!
Tuesday, March 13, 2012
Monday, March 12, 2012
5, 4, 3, 2, 1...
Happy Monday! I hope you had a wonderful weekend. I was in Washington, D.C. last week for work and had a whirl-wind week. I got to see my boss and her husband for the first time in ~7 years (we live across the country from each other). It was a great reunion of sorts to see several of the people I used to work with. The meeting was the start of my busiest time of year for work, but now I will procrastinate...
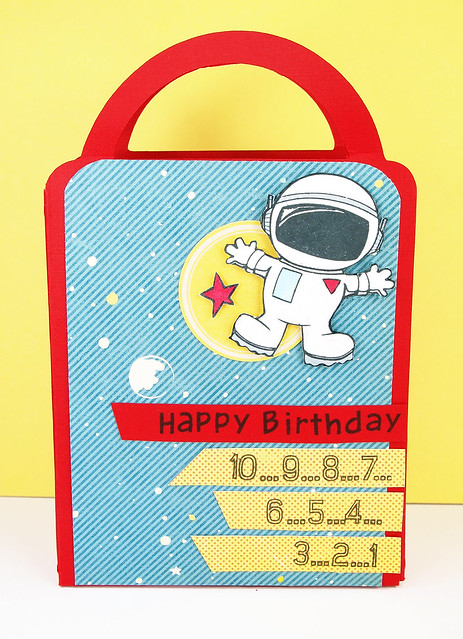
I've been so bad about updating my blog and making my blog rounds, and this week, I'm going to try and post every day (at least try!). I have dozens of cards and projects I haven't shared, and so I thought I would start with a gift bag that was in the Paper Crafts magazine's Jan./Feb. issue:
This bag has die cutting, coloring, fussy cutting, and masking--whew! The little astronaut, the star, and the countdown numbers are from Technique Tuesday. I masked the numbers (it's a continuous row of numbers) to fit the sketch.
Thanks for looking! Have a wonderful day!!
Here are the details:
Cardstock: Bazzill
Patterned Paper (Rocket Age) October Afternoon
Clear Stamps: (Out of This World) Technique Tuesday; ("happy birthday" from Bake Me a Cake) Lawn Fawn
Dye Ink: (Tuxedo Black) Tsukineko
Markers: Copics
Sticker: (moon from Rocket Age collection) October Afternoon
Thursday, March 1, 2012
Blowing By...Swooping In
Happy March! Is it just me, or did February pass in a blink? I've been busier with work lately, and I'm rolling into my super busy work time of year...
It's time for another Print Candee kit release! My teammates made some CUTE projects using the kit, and you can click on their links (to the right) to see them.
The Print Candee March kit is called Fantastic Boy, and it's all about boy themes. My son is turning 2 in three weeks, and I thought some papercrafted party goods would be great way to show the kit. Plus, Paper Crafts Magazine has been showing peeks of their Party Ensembles issue, and I was inspired. Here's what I came up with:
I made almost identical projects for my daughter's birthday a few months ago, so these projects came together very quickly. First, I printed two of the kit's papers (back and front), cut them into squares, and made pinwheels. I used lollipop sticks for the handle, and I added a drop of super glue gel (the regular stuff runs too much) around the brad in back to secure the pinwheel. I've had those brads for forever...it's always a good thing when hoarding pays off. Here's a picture of the great papers:
I also made a treat bag (yes, I was super lazy and didn't fill it with any prop candy but imagine some dark chocolate truffles...you know, the usual food for a two-year-old) using another paper. For the place card, I used one of the Print Candee kit journaling spots. All I did was open the image in Photoshop, resized it, typed the "Levi" in grey, and printed it. You could easily make one of these for each party guest (I did that for my daughter's birthday, and the kids liked having their names at the table). Here is the treat bag and the place card:
Aren't those helicopters so cute? Whew! Now I'm set for my son's birthday decorations (I'll add a few balloons, too).
Thanks for taking the time to visit! :) Have a great day!
It's time for another Print Candee kit release! My teammates made some CUTE projects using the kit, and you can click on their links (to the right) to see them.
The Print Candee March kit is called Fantastic Boy, and it's all about boy themes. My son is turning 2 in three weeks, and I thought some papercrafted party goods would be great way to show the kit. Plus, Paper Crafts Magazine has been showing peeks of their Party Ensembles issue, and I was inspired. Here's what I came up with:
I also made a treat bag (yes, I was super lazy and didn't fill it with any prop candy but imagine some dark chocolate truffles...you know, the usual food for a two-year-old) using another paper. For the place card, I used one of the Print Candee kit journaling spots. All I did was open the image in Photoshop, resized it, typed the "Levi" in grey, and printed it. You could easily make one of these for each party guest (I did that for my daughter's birthday, and the kids liked having their names at the table). Here is the treat bag and the place card:
Aren't those helicopters so cute? Whew! Now I'm set for my son's birthday decorations (I'll add a few balloons, too).
Thanks for taking the time to visit! :) Have a great day!
Thursday, February 16, 2012
Outruled
Happy Thursday! I hope you had a great Valentine's Day! This week is my first anniversary of my blog--woo hoo!
The last couple of months, I've been thinking more about publications, challenges and my abilities. This is not an "I want reassurance" post...I just wanted to share my thoughts and what I've realized.
I wish I could say that being rejected and losing challenges isn't disappointing. I wish I could be a better card maker/stamper/designer. I wish I could say I didn't sometimes feel intimidated when I see other designers' blogs and how gorgeous their cards are. But I can't. I do feel disappointment, I often make hideous cards (which, hopefully, don't make it onto the blog), and I do feel discouraged at times at my lack of natural craftiness.
With all that said, I made a conscious decision to change my approach to submitting cards for publication and to cut back on the challenges. I thought about what I do well, what I like, what makes me different:
The bottom line is, I work hard enough at work....I don't want my hobby to become laborious, too. I want to make cards I like and can use, and I don't want to get overly frustrated in the process. I've found that I've become happier lately with these realizations about my card making...kind of like when I first started blogging.
With all that said, I wanted to share a card I made for the Paper Crafts Magazine's Stamp It! Cards call that was rejected:
I ran across the "OUTRULED" digital stamp and laughed for a little while over the images (there's a whole series). I asked my bloggy friend Glenda if the image was too outrageous for a publication submission (I didn't want to promote/make fun of violence, but I thought it could make a spunky card). She reminded me why not try it? Yes, why not try it? If it was accepted, that's awesome, but it wasn't, and that's okay, too...at least I tried.
My best friend helped me come up with the sentiment (she came up with some good "out with the old," break-up themed sentiments, too). I don't have a "hello, shopping" stamp, so I made the sentiment in Word. I also made the patterned paper in the background (the dots are stamped onto some paper from Print Candee). Like I said earlier in my post, the card turned out very "me," and even though it's a little out-there, I still love it. And while this card wasn't accepted, I did get some awesome happy mail from Susan Opel. Yeah!
Thanks for indulging me and letting me blather on (and if you didn't read all that, I totally understand!). I really appreciate everyone's support. It's been a great year of blogging!
Have a great day!
The last couple of months, I've been thinking more about publications, challenges and my abilities. This is not an "I want reassurance" post...I just wanted to share my thoughts and what I've realized.
I wish I could say that being rejected and losing challenges isn't disappointing. I wish I could be a better card maker/stamper/designer. I wish I could say I didn't sometimes feel intimidated when I see other designers' blogs and how gorgeous their cards are. But I can't. I do feel disappointment, I often make hideous cards (which, hopefully, don't make it onto the blog), and I do feel discouraged at times at my lack of natural craftiness.
With all that said, I made a conscious decision to change my approach to submitting cards for publication and to cut back on the challenges. I thought about what I do well, what I like, what makes me different:
- I'm never going to be a top stamper...technically, I cannot seem to do what other stampers do (even getting stamps straight on the card can be hard sometimes!). But, I have gotten more interested in digital stamps/brushes and digital elements. I'm by no means an expert, but I think I'm getting better at using them. I know a lot of card makers don't like the hybrid world, but I think I've found something that works well for me.
- I like certain colors and patterns. I realized that I was using designs and colors I didn't like just to fit a challenge or a submission. While I really believe in trying new things, I want to make cards I love and will love to give. I hate being stuck with a card I can/will never use.
- I love when I find products I haven't seen or haven't seen often. I'm finding that I'm having better luck at getting projects accepted when I use less common products. Of course, this goes back to my first point...my cards aren't going to be as great as DT folks for big companies who are also submitting, so using unusual products has helped me.
The bottom line is, I work hard enough at work....I don't want my hobby to become laborious, too. I want to make cards I like and can use, and I don't want to get overly frustrated in the process. I've found that I've become happier lately with these realizations about my card making...kind of like when I first started blogging.
With all that said, I wanted to share a card I made for the Paper Crafts Magazine's Stamp It! Cards call that was rejected:
My best friend helped me come up with the sentiment (she came up with some good "out with the old," break-up themed sentiments, too). I don't have a "hello, shopping" stamp, so I made the sentiment in Word. I also made the patterned paper in the background (the dots are stamped onto some paper from Print Candee). Like I said earlier in my post, the card turned out very "me," and even though it's a little out-there, I still love it. And while this card wasn't accepted, I did get some awesome happy mail from Susan Opel. Yeah!
Thanks for indulging me and letting me blather on (and if you didn't read all that, I totally understand!). I really appreciate everyone's support. It's been a great year of blogging!
Have a great day!
Monday, February 13, 2012
Butterfly Camouflage
Happy Monday! Today the Print Candee Creative Team is having a blog hop-woo hoo! You can start at the beginning at the Print Candee blog:
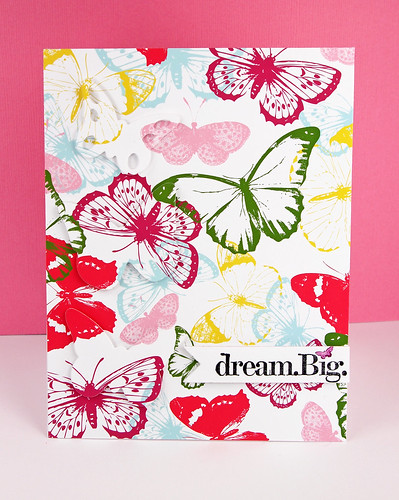
We have a local butterfly house, and when you're inside, the butterflies are so thick, they look like camouflage at times. The place is very inspiring! We're going with a die-cuts theme, and I came up with this card:
I used Adrienne Looman's Photoshop Brush Butterflies available at Print Candee to make the background. I started with a white background in Photoshop and layered the butteflies to make my own patterned paper. I changed the colors, sizes, types of butteflies, and rotated the brushes to give the appearance of flight. When I finished, I printed two copies of the paper.
For the die cuts, I used the second paper and die-cut three butteflies. When I told my husband I had more than one buttefly die, he replied, "Why am I not surprised?" ;) I carefully layered die cuts over the first paper and popped them up with foam dots. Here's a close-up:
I finished the card off with a a die-cut banner, and I stamped the sentiment from Unity. I thought I would enter the card into the Moxie Fab World Die Cutting Challenge. The challenge ends tonight, but there's still time to enter if you get a chance!
As part of the blog hop, we're giving away a couple of prizes: a $10 gift certificate to Print Candee and a set of Spellbinders Lacey Nested Pennants--perfect for making party banners! To enter, you can leave a comment here and all along the blog hop. You have until the end of Saturday night to leave comments to win, and the winners will be posted on the Print Candee blog.
Next up is the fabulous Marion! Thanks for taking the time to visit. :)
{Me}
For the die cuts, I used the second paper and die-cut three butteflies. When I told my husband I had more than one buttefly die, he replied, "Why am I not surprised?" ;) I carefully layered die cuts over the first paper and popped them up with foam dots. Here's a close-up:
I finished the card off with a a die-cut banner, and I stamped the sentiment from Unity. I thought I would enter the card into the Moxie Fab World Die Cutting Challenge. The challenge ends tonight, but there's still time to enter if you get a chance!
As part of the blog hop, we're giving away a couple of prizes: a $10 gift certificate to Print Candee and a set of Spellbinders Lacey Nested Pennants--perfect for making party banners! To enter, you can leave a comment here and all along the blog hop. You have until the end of Saturday night to leave comments to win, and the winners will be posted on the Print Candee blog.
Next up is the fabulous Marion! Thanks for taking the time to visit. :)
Wednesday, February 1, 2012
Love Monster
Happy Wednesday! I'm excited to share my projects today for the first ever Print Candee kit. The kit includes coordinated papers, clip art, borders, alphas, journaling tags, and a few other goodies. You can check out the kit on the Print Candee blog.
A while back, by blogging buddy Heather started making square bookmarks--so cool! I searched for a tutorial on how to make a square bookmark and found one here. I used her super cute template to make a monster bookmark and also made a corresponding gift bag with the Print Candee February kit:
For the bookmark, I used some of the Print Candee papers. Unfortunately, I didn't take a picture of the bookmark on an actual book, but the teeth overhang the corner of a page. Here's a close-up:
I also made a gift bag using several papers in the Paper Pack, banner pieces in the Alphas & Bits pack, and one of the border strips. You can see how the banner and photo corner were used for teeth, although any patterned paper would work. Here's a close-up:
Using Photoshop, I layered the striped paper in the background added the red polka dotted paper below. Then, I added the "be mine" border on top of the polka dotted paper. It was a good way to add a sentiment, although a tag would be cute, too. Here's a close-up:
I finished the gift bag off by punching holes in the top and threading some Doodlebug twine.
The Print Candee February kit can be purchased as a kit or in parts. For the first week of February, it is available for 35% off, too. What a deal!
Be sure to check out the other DT projects! We also have a new DT member--Lisa Arana--woo hoo! So excited to have her on board with us. She'll be joining us in a couple of weeks for a blog hop.
Thanks so much for the comments...I really appreciate them! Have a great day!
Subscribe to:
Posts (Atom)