Hi everyone! Woo hoo! It's Friday. Thank goodness. LOL! Any plans for the weekend?
I'm guesting with Winnie + Walter again today. Yeah! :) The more I use the stamps, the more I love them. All of the stamps coordinate well together--got to love that! You can check out my guest post on the Winnie + Walter blog.
Here's what I came up with for today:
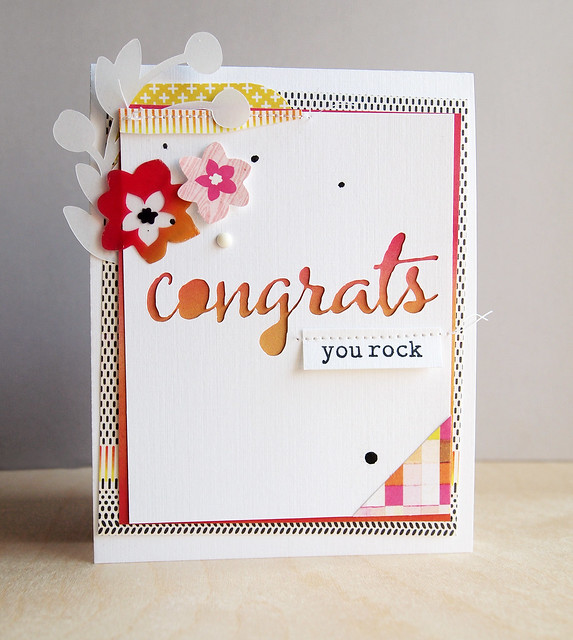
I used the Winnie + Walter The Big, the Bold, and You cutting files to die-cut the "congrats." I love the handwritten sentiments in the stamp set and cutting files! I finished the sentiment by stamping the "you" and "rock" from The Big, the Bold, and You stamp set.
I layered the panel over some Highline papers and added a few die-cuts and a transparency from the same collection. I thought the card needed one more element, so I die-cut the branch from the Leave it to Mom cutting files out of vellum. Here's a close-up:
Did you see that there's a Hip on Handwriting Challenge at the Moxie Fab World? I'm linking up. The challenge runs for a couple of weeks, so you have time to play along. :)
Thanks again to Shay and Julie at Winnie + Walter for having me guest. They are the nicest, funniest, and most supportive people. :)
Have a great weekend. Thank you so much for stopping by!
Supplies
Cardstock: (White Linen) Ellen Hutson; (Linen Vellum) PTI
Patterned papers: (all from the Highline collection) BasicGrey
Stamps: ("you rock" from The Big, the Bold, and You) Winnie + Walter
Ink: (Tuxedo Black) Tsukineko; (Black Velvet mist) Heidi Swapp
Die-cutting: ("congrats" from The Big, the Bold, and You; leaf/bud from Leave it to Mom cutting files) Winnie + Walter
Embellishments: (transparency, photo corner, flower from the Highline collection) BasicGrey; (enamel dot) My Mind's Eye
Showing posts with label Moxie Fab World. Show all posts
Friday, April 25, 2014
Wednesday, December 4, 2013
Moxie Fab Hoops
Hi everyone!
I'm guesting over at Moxie Fab World. Please check out my Hoop La post--thanks!
Have a super day!
Have a super day!
Saturday, November 9, 2013
A Moxie Fab Thanks
Hi everyone!
Are you here for the monster blog hop for Cath Edvalson? There are almost 300 of us participating as a way to say "thank you" for all she has done for the papercrafting community. We're going to miss her! *sniff * *sniff*
If you want to start from the beginning, you can go to the Moxie Fab World blog. You should be coming from my dear friend JJ Bolton's blog.
Since there are about 270 blogs to go, let's get to it!
Cath lives in New Hampshire, and the folk art look of the houses and hills in the Odl-lay-hee paper remind me of her photos. I thought the sentiment was fitting for the occasion. :)
Here's a close-up:
Cath, you've touched so many people. Your encouragement, photos, and words have inspired many, and you've brought people together. Moxie Fab World is much more than a blog--it's a community, and it's because of you. I will miss you terribly at Paper Crafts! I know that you will inspire others in whatever you do next.
I hope you'll hop along and give Cath a big Moxie Fab thanks! Next up is the fabulous Daniela!
Thanks for stopping by!
Supplies
Cardstock: (Rustic White) PTI
Clear stamps: (sentiment) Swissgirl Designs--no longer available
Ink: (Strawberry) Fresh Ink
Digital element: (paper from Odl-lay-hee) Deena Rutter
Friday, August 9, 2013
Camping Party
Hi everyone! I hope you had a fabulous week! Any weekend plans?
Today I'm up on the Newton's Nook Designs blog. I'm sharing a birthday party invitation using two of their stamp sets:
I stamped and fussy cut the raccoon from Campfire Tails (love him; love the set) and paired it with the "birthday" and party banner from the Winged Wishes set. I wanted to make the invitation mass-producible, so I kept the coloring very minimal. Here's a close-up:
I added angle washi tape again (like I did here). It was a fast way to give the card base a little pizazz.
The invitation matches the party favor box I made during the Newton's Nook July release. One more item, and I'll have an ensemble. :)
I'm entering the invitation in the Birthday Party Invitation Challenge in the Moxie Fab World. The Birthday Creations challenges end on Monday, so there's still time to enter.
Thanks for stopping by!
Supplies:
Cardstock: (Kraft, Ripe Avocado) PTI
Patterned paper: (woodgrain from S'more Love) Cosmo Cricket
Clear stamps: (raccoon from Campfire Tails; sentiment and banner from Winged Wishes) Newton's Nook Designs
Ink: (Tuxedo Black) Tsukineko
Color: (markers) Copic; (colored pencils) Derwent
Embellishments: (washi tape) Bella Blvd.
Die: (polaroid die) My Favorite Things
Today I'm up on the Newton's Nook Designs blog. I'm sharing a birthday party invitation using two of their stamp sets:
I stamped and fussy cut the raccoon from Campfire Tails (love him; love the set) and paired it with the "birthday" and party banner from the Winged Wishes set. I wanted to make the invitation mass-producible, so I kept the coloring very minimal. Here's a close-up:
I added angle washi tape again (like I did here). It was a fast way to give the card base a little pizazz.
The invitation matches the party favor box I made during the Newton's Nook July release. One more item, and I'll have an ensemble. :)
Thanks for stopping by!
Supplies:
Cardstock: (Kraft, Ripe Avocado) PTI
Patterned paper: (woodgrain from S'more Love) Cosmo Cricket
Clear stamps: (raccoon from Campfire Tails; sentiment and banner from Winged Wishes) Newton's Nook Designs
Ink: (Tuxedo Black) Tsukineko
Color: (markers) Copic; (colored pencils) Derwent
Embellishments: (washi tape) Bella Blvd.
Die: (polaroid die) My Favorite Things
Wednesday, March 13, 2013
Market Street Stamps, Part II
Hi everyone! I'm a guest blogger with Market Street Stamps, and today I'm sharing my second set of projects on their blog today. You can check it out HERE. :)
Supplies
For today’s
projects, I used the Shine
On set by Stephanie Washburn. This set rocks! It has several Christmas
images, but there are also sentiments that fit for every day projects.
I thought it
would be fun to make a set of cards, and I ended up making a card to give with
the set. I started off making this CAS card:
I stamped
the sunburst image with Versamark on Rustic White cardstock and heat embossed it with Enchanted
Gold. These stamps stamp very cleanly (love that!), and I didn’t have any issues with uneven
lines. I finished off the card by stamping a sentiment from the Shine On set.
Here’s a
close-up to see the embossing:
Next, I made
the card set. I started off by misting white cardstock with several glittery mists to create a background. Here's what each looked like:
The misting was pretty haphazard since most of it would be covered up....I was primarily trying to get a mottled background. Then, I used the same design and heat embossed the sunburst image in a sparkly orange color:
I liked how
the misting in the background complemented the sun. It was worth the stained
fingers to have a custom background. ;)
I made three
identical cards, and then I decided to make one card slightly different.
(What can I say? I’m fickle.) For the fourth card in the set, I created an ombre:
I’m entering this card into the Moxie Fab World Ombre Challenge. While I typically think of ombre within one image, in this card it's broken up between the red sentiment and then the orange and gold sunburst rays. Here's a close-up:
I want to give a big thanks to Angelica and Jorge at Market Street Stamps for having me. It’s been awesome!
Have
a great day!
Supplies
Cardstock: (Rustic White) PTI
Clear stamps: (Shine On) Market Street Stamps
Ink: (Real Red) Stampin' Up; Versamark
Spray mists: (Candy Apple, Peach Delight Glimmer Mist) Tattered Angels; (Dandelion) Fireworks; (Marigold Yellow Orange Starburst) Lindy's Stamp Gang
Embossing powder: (Enchanted Gold) Ranger; (glittery orange) mystery craft supply
Monday, December 17, 2012
Moxie Fab
Hi everyone! I have been so anxious to share the news, and now I finally can: I'm the Moxie Fabber of the Week! Eek!!
When Cath e-mailed me earlier this fall, I was so incredibly honored (and excited) to be asked. I've enjoyed reading the Moxie Fabber of the Week posts for a couple of years, and I still can't believe it's me! You can read the post HERE. Thank you so much, Cath!
I thought I would share a little card I made with some new Two Peas products:
Isn't that "LOVE" great? The sentiment and the digital patterned papers are all from Just Jaimee. I just printed the layers and popped them up with some foam tape.
If you like non-traditional Valentine's Day cards, this one would be quick and mail-able.
Here's another angle where you can see the distressing under the sentiment:
Now, how about a giveaway? Please leave a comment by Saturday (12/22), and I'll send one person a $10 gift certificate to Two Peas in a Bucket. I would love it if you follow my blog, but you don't have to for the giveaway. :)
Thanks again to Cath and for everyone's support. I may not say it often enough, but I so appreciate your comments, well-wishes, and support.
Have a great day!
Sunday, December 16, 2012
To the Max
Hi Everyone! I've had a card ready to post for the past few days, but after the Newtown tragedy, I decided to hold off. Some of you regular readers may know I have a 6-year-old, and reading about what happened is hard to grasp. My thoughts and prayers go out to everyone affected.
I decided to go ahead and post my card for the Moxie Fab World Keen on Neon challenge:
It's a neon hybrid card. I found out I couldn't make true neon with my computer and printer, but I got pretty close. It took about half a dozen test prints to figure out the colors.
I wanted to use 1980s patterns to match with the neon colors. Using three different Just Jaimee's digital brushes, I stamped the half-tone, paint splash, and splatter. It makes me want to pull out my crimper and dance to the Bangles. Hee hee
I created my own retro sentiment in Photoshop and angled the words. Even the font reminded me of the computer in the 1980s movie "War Games" (why do I remember these things??).
Here's a close-up:
I finished the card off with some Heidi Swapp neon washi tape.
Has anyone else tried using neon on the computer? I'd love to hear tips! Here is what I found:
Thanks so much for looking!
Supplies
Cardstock base: (white) PTI
Other paper: (Premium Matte Photo Paper) Office Max
Digital brushes: (Halftone Brushes 2), (Keepin It Real Brushes 3), and (Just Speckled) from Just Jaimee
Washi: (Neon washi tape) Heidi Swapp
I decided to go ahead and post my card for the Moxie Fab World Keen on Neon challenge:
It's a neon hybrid card. I found out I couldn't make true neon with my computer and printer, but I got pretty close. It took about half a dozen test prints to figure out the colors.
I wanted to use 1980s patterns to match with the neon colors. Using three different Just Jaimee's digital brushes, I stamped the half-tone, paint splash, and splatter. It makes me want to pull out my crimper and dance to the Bangles. Hee hee
I created my own retro sentiment in Photoshop and angled the words. Even the font reminded me of the computer in the 1980s movie "War Games" (why do I remember these things??).
Here's a close-up:
I finished the card off with some Heidi Swapp neon washi tape.
Has anyone else tried using neon on the computer? I'd love to hear tips! Here is what I found:
- Neon colors look a little scary on the computer screen. The colors look different when printed. (It took me a while to figure that out!)
- The color codes for Pantone neon colors can be found HERE.
- I had to run several test prints. Using the Pantone codes, I had to lighten all three colors.
If you get a chance, link up to the Moxie Fab World challenge. :)
Supplies
Cardstock base: (white) PTI
Other paper: (Premium Matte Photo Paper) Office Max
Digital brushes: (Halftone Brushes 2), (Keepin It Real Brushes 3), and (Just Speckled) from Just Jaimee
Washi: (Neon washi tape) Heidi Swapp
Friday, September 7, 2012
We Click
Happy Friday! Well, my daughter's back in school, my big work projects are done, and things are finally returning to normal. I figured I would be crafting up a storm, but instead I've been feeling pretty non-crafty the past couple of weeks. *sigh* The other day, I even chose cleaning over crafting. Yep, it's clinical.
So today, I'm sharing one of my cards over at Two Peas:
This card was technically one of the more difficult cards I've made--lots of trial and error. The "click" with the graph paper is an enlarged Captured digital journaling card from Hello Forever. The journaling card was in grey, and after playing around, I changed the card into an overlay with "Hard Light" function and adjusted the hue and saturation.
The cute cameras are from Adrienne Looman's Retro Camera set. For the hearts, I inked some Studio Calico wood veneers with a Distress Ink. Here's a close-up:
Supplies
Cardstock: (white) Stamp School
Specialty Paper: (Premium Matte Photo Paper) Office Max
Digital Elements: (cameras from Retro Camera) Adrienne Looman; (journaling card from Captured) Hello Forever both available at Two Peas in a Bucket
Stickers: (alphas) My Little Shoebox
Embellishments: (wood veneer hearts) Studio Calico
Ink: (Mustard Seed Distress Ink) Ranger)
So today, I'm sharing one of my cards over at Two Peas:
This card was technically one of the more difficult cards I've made--lots of trial and error. The "click" with the graph paper is an enlarged Captured digital journaling card from Hello Forever. The journaling card was in grey, and after playing around, I changed the card into an overlay with "Hard Light" function and adjusted the hue and saturation.
The cute cameras are from Adrienne Looman's Retro Camera set. For the hearts, I inked some Studio Calico wood veneers with a Distress Ink. Here's a close-up:
I'm entering this card into the Moxie Fab World Movement challenge. I usually think of movement literally, but with the Paper Crafts' Card Design Handbook, I saw fab examples of movement by drawing the eye from one element to the next. In this card, it would be the hearts, camera, "we," and "click."
Thanks for looking. Have a great weekend!
Cardstock: (white) Stamp School
Specialty Paper: (Premium Matte Photo Paper) Office Max
Digital Elements: (cameras from Retro Camera) Adrienne Looman; (journaling card from Captured) Hello Forever both available at Two Peas in a Bucket
Stickers: (alphas) My Little Shoebox
Embellishments: (wood veneer hearts) Studio Calico
Ink: (Mustard Seed Distress Ink) Ranger)
Friday, July 20, 2012
A Little Happy
I hope you're having a good Friday!
I wanted to play along with Unity's Friends with Flair and the Moxie Fab World Tuesday Trigger:
So cool! The lines of triangles and the general color scheme inspired me. Here's what I came up with:
I started off with one of Erica Hernandez's digital triangle template. I re-sized some different papers from Adrienne Looman Baers Garten and clipped them to the rows of triangles.
Then, I reprinted the image a second time to cut out the triangles. I layered the triangles on top of the template, stitched through them, and lifted the edges. Here's a close-up:
Finally, I stamped the Unity sentiment using my new Stampin' Up ink pad (thanks, Erin Lee!). I love this sentiment. :)
Thanks for looking. Have a wonderful weekend.
Supplies
Cardstock: (Sweet Tooth) Stamp School
Stamp: (sentiment from May 2010 KOTM) Unity
Ink: (blue) Stampin' Up
Template: (Triangulation Template) Erica Hernandez
Papers: (blue from Blue Sky papers) Baers Garten; (yellow, floral, and peach from Petunia papers) Adrienne Looman
Sunday, November 13, 2011
Fa la la la la la la la la
I've had an idea for the Moxie Fab World Tuesday Trigger for over a week, but I finally got around to making the card. Here's the trigger:
I did what Karen suggested about looking at a photo and then stepping away to see what you remember. I kept thinking of the pink/blue/yellow linked together and all of the gold, so I made a Christmas card with those elements:
First, I misted cardstock with each color. Next, I die cut the base and snowflake layers from Memory Box and then embossed the snowflake layer. I'm not much of a heat embosser...I think I embossed each one 3 times to get a relatively smooth gilded look...ha ha. Here's a close-up where you can see the misting:
I am officially addicted to mists. And, I have to say the Memory Box dies cut amazingly well...no struggling to get the pieces out like some dies.
I also used the PTI Linen impression plate on the base and stamped the Technique Tuesday's Good Cheer sentiment. Here's a close-up:
If you go onto the Moxie Fab World site, Cath posted a great tribute to Katie Renz. Cancer really sucks.
Enjoy the rest of your weekend. We had our first (momentary) snowfall about an hour ago...it's officially winter.
Wednesday, October 12, 2011
It's the Great Pumpkin!
Yesterday afternoon, when I stepped outside to walk to my daughter's school, it really hit me that it's fall. While it's been "hot" here, the sun was lower in the sky and it reminded me how quickly the days are shortening. Yikes! I love fall, though, and I'm excited for Halloween.
I've had an idea floating around in my head for a Halloween card, and I love how it worked out. In fact, I liked it so much, I made three variations! Here's the layered version:
While there were several steps for making the pumpkins, they were pretty easy to make. I used my dwindling stash of Amy Tangerine and AC Nightfall papers and die cut ovals with my Nesties. I played around with the layers and then stitched them onto the card base.
For the background, I stamped the Dash Pattern background stamp from Hero Arts with Versamark. I used PTI's Edgers #1 to make the bottom strip and then adhered the strip of paper from Studio Calico's Autumn Press at the bottom. I made the sentiment in Word and printed it onto the patterned paper. I totally dig how the brown and black look together...it's not a color combo I ever use, but I'll be using it again.
I'm linking this card up to the E.A.D. Designs "Be Thankful Color Challenge" that I saw on Amy's blog. There are other colors peeking through, so I hope it counts. If you get a chance, check out the challenge!
I had extra pumpkin layers, so I made more cards. Here's the CAS version:
On the base, I printed the sentiment (Two Peas' Journaling but expanded), but otherwise used the same Hero Arts stamp and patterned papers. The orange base paper is also from Autumn Press, and the twine is May Arts (love their natural twine!).
Lastly, here's a small card (4 1/4" square). I went WAY out of my comfort zone (more like out the door and down the street):
I started with the same base but then painted the edges, used several Distress Inks to provide depth, and (shriek!) distressed the edges lightly. To me, the edges looks like fog--I love how it turned out! Like the CAS card, I made the stem of the pumpkin out of brown cardstock.
Here's a close-up of the layers on one of the pumpkins:
The layered pumpkins have so much texture (and movement). I thought I'd link up to the Moxie Fab World Textured to Perfection Challenge (especially the last card with the painted and inked edges).
I wanted to pass along that Print Candee reached 1000 fans on Facebook, and to celebrate, they are having an amazing giveaway on their blog. They are giving away a $100 Amazon and $50 Michael's gift certificates (wow!). Go to THIS post to check out how to leave a comment to enter, and while you're there, check out the blog!
Thanks for looking! I hope you're having a good week!
Sunday, October 9, 2011
Chevron Feather
I grew up in the Phoenix area, and I still love the southwestern motifs--the colors, the angles, the repetition of patterns. So even though the the Moxie Fab World Tuesday Trigger is a dessert, the colors, the rustic feel, and striped layers reminded me of a southwestern vibe:
So, playing with the southwestern feel and stripes, I came up with an idea based on a feather. I must say I find some irony in the fact that I thought of a feather when I looked at an overloaded dessert (maybe I thought it was a low-cal dessert). Anyhoo, here's this card:
This card is actually my second version. The first one had the feather's quill, but there were some wonky issues with balance (it didn't look right unless I made the card about 9" tall). Oh well...live and learn. In this version, I eliminated the quill and ran the chevrons all the way down. I also left the chevron edges unglued to make the edges more feathery, so some of the points are a little curled up.
The chevrons are over a golden shimmery Bazzill that I misted with Mr. Huey's Cream. It's a little hard to see the misting in the photo, but here's a close-up:
The sentiment is from Technique Tuesday's Studio AE's August set (isn't it a fab stamp?). I also added a thin strip of wood veneer along the side. Beside the fact that I am addicted to my husband's stash of veneer lately, I think it works with the rustic look of the card.
Thanks for looking!
So, playing with the southwestern feel and stripes, I came up with an idea based on a feather. I must say I find some irony in the fact that I thought of a feather when I looked at an overloaded dessert (maybe I thought it was a low-cal dessert). Anyhoo, here's this card:
The chevrons are over a golden shimmery Bazzill that I misted with Mr. Huey's Cream. It's a little hard to see the misting in the photo, but here's a close-up:
The sentiment is from Technique Tuesday's Studio AE's August set (isn't it a fab stamp?). I also added a thin strip of wood veneer along the side. Beside the fact that I am addicted to my husband's stash of veneer lately, I think it works with the rustic look of the card.
Thanks for looking!
Monday, October 3, 2011
Poker Christmas
I wanted to write a quick post to join in the Moxie Fab World Card Play Challenge.
When I was about 8, my grandparents taught me how to play poker. They never went to casinos or were gamblers, but they had grown up in the pre-Depression-era playing card games and wanted to share all of the fun poker games. Every time I visited, we played for several hours a day (for money, no less), and I learned a lot! Playing was all fun, and I'm sure my grandfather folded good hands on a few occasions to let me win. Although I never play anymore, I have very fond memories of playing cards with them. Sorry to ramble on!
I inked up my Unity Suzi Blu stamp again to make a card based on playing cards:
Her dress is (obviously) made from a playing card, and the heart in her hand is fussy cut from the five of hearts. In the stamp, she's holding flowers in her right hand, so I masked the flowers to only show her hand. Otherwise, I just paper pieced the rest of her outfit and colored her with Copics and colored pencils. Here's a close-up of Suzi:
Very stylish! I wish I could wear her outfit!
I went back and forth on the sentiment, but I really liked this one from Waltzingmouse Stamps. It's a little quirky for a Christmas card, but I'm the type of person who likes a little quirkiness now and then (okay, maybe all of the time).
Once I finished the front, I liked it so much, I decided I would frame it for Christmas decor. Of course, I realized after I had cut the front panel that it's a non-traditional size and will require a mat. I wish I would think of these things in advance--ha ha!
Thanks for looking! Have a great day!
Friday, August 26, 2011
Warning: Contagious!
Don't say I didn't warn you when you're saying the phrase on this stamp over and over today. Ever since I worked on this card last night, I must have said it a couple hundred times. It's driving me crazy! But I still love this card anyway:
I'm playing along in the Moxie Fab World horizontal sketch challenge and I'm linking up to Unity's Friends with Flair this week. I made the sentiment in Word and printed it before I misted the page. I love how it looks like the measles (not that I love the measles). I doodled underneath the sentiment...I thought it worked with the kiddo theme.
Does anyone else remember giving each other cootie shots in school? We had very elaborate, multi-step cootie shots that eventually progressed to warming up and cooling down the arm after the shots. Anyone else do that? Anyhoo, I thought the stamp worked well for a get well card. Here's a close-up:
This cootie shot stamp is from Unity's Middle School Madness set. I don't think the set is available anymore, which is a shame...it's a hilarious set!
Thanks for looking! Have a great weekend!
Here's the scoop:
Cardstock: (Vintage Cream) PTI
Patterned Paper: (12 Days of Christmas) My Mind's Eye; (not sure of the collection) Echo Park
Ink: (Cough Syrup) Jenni Bowlin; (mist) Tattered Angels
Font: (2 Peas Scrapbook) Two Peas in a Bucket
Saturday, May 21, 2011
Sweet Tooth
I decided to play along with this week's Moxie Fab World Tuesday Trigger:
Loved the picture, but at first, nothing came to mind. Then I thought about how the cake looks like a little box, and so I decided to make a box incorporating the same colors, loop-de-loops, and the sweet tooth angle:
See the tooth? Get it, sweet tooth? (ha ha ha, I crack myself up!). So, here's the deal: The box is actually for my daughter's first tooth, which fell out a couple of weeks ago (hence, the tooth on the tag). The tooth fairy came, and now I have this tooth that I didn't want to just toss, but it would get crushed in her baby book. So, a box it is. Here are a few close-ups:
Anyhoo, to make this box, I used a My Time Made Easy template, resized it in SCAL, and cut it out on my Cricut. Then, I stamped the Mint Motif Beyond Borders on the wrapper portion of the box before assembling. I lined part of the inside of the box with patterned paper to add a little pop of pink and to include the loops again. The tooth on the PTI tag is a clip art picture. I glued two tags together, and on the backside, you can see a tiny heart that I inked and heat embossed with holographic e.p. I'm hoping to make a little pillow for the inside, or maybe my mom will make a pillow (hint, hint).
As an aside, a big thank you to PaperCrafts for accepting a few of my cards for the Card a Day call (I was absurdly excited!). And a big thank you to Paige at the create blog for including one of my pink cards in last week's challenge gallery!
Thanks so much for looking!
Here are the deets:
Stamps: Beyond Borders (Mint Motif)
Ink: Sky Blue (Brilliance)
Embossing Powder: Holographic (Ranger)
Cardstock: white (PTI)
Patterned Paper: (Bo Bunny)
Digital Element: Under Cover (My Time Made Easy)
Dies: Tiny Tags (PTI)
Border Punch: (Martha Stewart)
Ribbon: (May Arts)
Loved the picture, but at first, nothing came to mind. Then I thought about how the cake looks like a little box, and so I decided to make a box incorporating the same colors, loop-de-loops, and the sweet tooth angle:
See the tooth? Get it, sweet tooth? (ha ha ha, I crack myself up!). So, here's the deal: The box is actually for my daughter's first tooth, which fell out a couple of weeks ago (hence, the tooth on the tag). The tooth fairy came, and now I have this tooth that I didn't want to just toss, but it would get crushed in her baby book. So, a box it is. Here are a few close-ups:
The whole idea of a box for her tooth reminds me a little of my husband's grandmother. Apparently, she kept jars of her body parts on her living room shelf from various surgeries throughout her life. She was from the generation where you never threw anything away in case you needed it later...although I can't think of a time when a spare gallbladder would come in handy.... Hopefully, I'll just stick to the one tooth.
As an aside, a big thank you to PaperCrafts for accepting a few of my cards for the Card a Day call (I was absurdly excited!). And a big thank you to Paige at the create blog for including one of my pink cards in last week's challenge gallery!
Thanks so much for looking!
Here are the deets:
Stamps: Beyond Borders (Mint Motif)
Ink: Sky Blue (Brilliance)
Embossing Powder: Holographic (Ranger)
Cardstock: white (PTI)
Patterned Paper: (Bo Bunny)
Digital Element: Under Cover (My Time Made Easy)
Dies: Tiny Tags (PTI)
Border Punch: (Martha Stewart)
Ribbon: (May Arts)
Wednesday, April 6, 2011
April Showers...
We were taking a walk around the neighborhood yesterday evening and I did see a funny looking green object coming out of the ground. Could it be? Possibly? Can I utter the words (flower bulbs) without jinxing it?
Yeah, spring! In honor of the season, I made another bold flower card. The color and blooms inspiration came from the Moxie Fab World's Tuesday Trigger pic:
Love the varied colors. I decided to use about 10 Tim Holtz Alcohol Inks for the background like I did in this card. Luckily, the sun has been out the past couple of days, so I was able to snap a brighter photo:
Isn't that tie-dye effect brash and perfect for spring? My 5-year-old and I often make these together (I made this one, but her backgrounds are often way-better than mine). We drop 1 drop of ink on the photo paper at a time and immediately blow on it several times through a half-size straw. She hasn't passed out yet from the rapid blowing...always a good thing.
The cute sentiment is from the Hello Friend from PTI. I really like how the sentiment works with the rest of the card. Here's a close-up of the flower:
The cool flower stamp is Penny Black's Burst of Stars and I heat embossed it for more contrast (this week's PTI Make It Monday challenge).
I hope you have a great day! Thanks for looking and thanks for the comments!
Here's the scoop:
Cardstock: white (PTI), red (AC cardstock)
Stamps: Burst of Stars (Penny Black); Hello Friend (PTI)
Ink: Frost White (Colorbox); Warm Red (Cat's Eye); Tim Holtz Alcohol inks
Ribbon: American Crafts
Rhinestone: Doodlebug Designs
Subscribe to:
Posts (Atom)