Showing posts with label love. Show all posts

Wednesday, July 15, 2015

To the Moon for You

Hi everyone!

Moon for You

I'm up on the Altenew blog with a card and a tutorial on making the nighttime sky. I hope you check it out! :)

Thanks so much for stopping by! Have a great day!

Wednesday, May 20, 2015

Embellishing a Shaped Card

Hi everyone! How's your week going? We're out of school now--woo hoo!

I'm up on the Maya Road blog with a couple of cards. Here's one:

You Are My Sunshine

As soon as I saw the Maya Road You Are My Sunshine buttons, I knew I had to use them as owl eyes. I started by die-cutting the owl Build-a-Critter die I picked up when Clear and Simple Stamps had a half-off sale last year.

For the nose, I inked up the Maya Road Mini Confetti Heart chipboard with gold ink. At the bottom of the owl, I added the new Pearl Trim. What owl doesn't need a set of pearls?


You Are My Sunshine


I finished the owl by adding the adorable Maya Road Sparkle Sequin Bow. I am loving these bows and having a hard time not putting them on every card. As a matter of fact, I used the bow on my second card, which is on the Maya Road blog. I hope you check it out! :)

Thanks so much for stopping by!


Friday, May 8, 2015

Puppy Love

Hi everyone! It's Friday--yeah! My daughter is in a play tonight, and she's having a party tomorrow...it's going to be a busy weekend here.

Today, I'm up on the Maya Road blog sharing a card, ways to alter metal clips, and a tutorial for embossing metal clips. I've developed quite an addiction to the Maya Road clips. They are so cute!

The clip I altered is on this new puppy hybrid card:

Puppy Love

I started by embossing the background with the MFT Polka Dots Cover-up. Next, I layered digital patterned papers from the From Where I Stand collection by Paislee Press.

There are more photos and a tutorial showing how to alter the clips on the Maya Road blog. I hope you check it out!

Thanks so much for stopping by! Have a great weekend!


Supplies
Cardstock: (white) Papertrey Ink
Patterned paper: (From Where I Stand digital collection) Paislee Press at The Lilypad
Ink: (Opaque White Mr. Huey's) Studio Calico; VersaMark
Embellishments: (Framed Sayings TransparencyVintage Doily TransparencyGold Heart Tag CharmLucky Star Wood ButtonMini Pom Pom Trim; Man's Best Friend Clip; Our Home Kraft Tag; Princess Jute Cording) Maya Road
Embossing powder: (Sunshine) Sparkle 'n Sprinkle

Thursday, April 2, 2015

Light It Up Blue for Autism Awareness

Hi all! Happy World Autism Awareness Day! I'm participating in a special blog hop:


If you're hopping along, you should be coming from Scrap Addict's blog.

Veronica and Tenia organized this hop, and I'm honored to attend! In addition to all of the awesome cards that are in the hop, there are also fantastic sponsors who have shown their support for Autism awareness. You can see the complete list of participants and sponsors on Veronica's blog.

I don't talk much about my job on the blog, but I work as a consultant in special education. This hop has a lot of meaning to me!

Anyhoo, here's my blue card:

Moon and Back

I was inspired by Julie Ebersole, and in fact, bought this Savvy Stamps die because THIS card (she's such a covert enabler--ha ha). I watercolored the moon with Blue Slushie Maya Mist. I had the idea to use the leftover alphas to make a loose trail. It's kind of weird, but I like it. ;)

Here's a close-up of the moon:

To the Moon and Back


The die-cut vellum stars are from Paper Smooches' Stars dies. I added some white and gold splatter to the base. The card looked a little naked at the bottom, so I dip-dyed the cardstock using the same spray mist. 

I've been playing around with my photos, and here's a different angle. Any comments on which picture is better? 

Moon and Back


If you get a chance to link up your blue project, you can do so at Veronica's blog. She also has the list of sponsors. The winners of the giveaways will be drawn from the comments, and the more comments you leave on the participants' blogs, the greater your chances to win! 

Have a great day! Thanks for stopping by!


Monday, March 16, 2015

Altenew March Blog Hop

Hi everyone! Sorry to be so absent....I was on an 11-day work trip. Yikes! Now that I'm home, I'm trying to catch up on posts. Today, I'm participating in a special Altenew blog hop:


Yep, Altenew is releasing dies and new antique trims! Altenew is releasing 12 stamp-matching dies this month, and the antique trims include foiled frames. You can check them out in the shop HERE. To celebrate, we're having a blog hop. If you're hopping along, you should be coming from May's blog. Here's the complete list:

Jocelyn Olson <-- You are here.

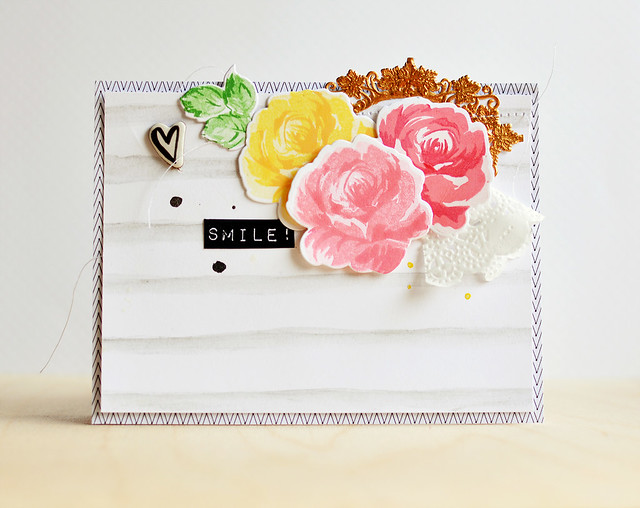
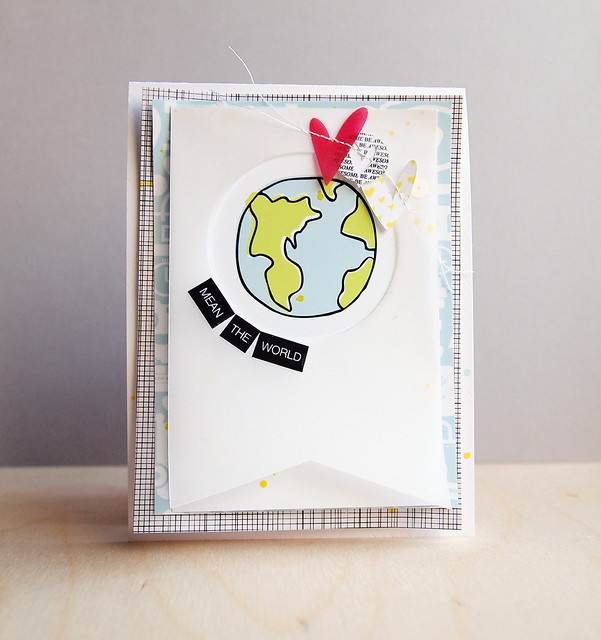
I made two projects, both using the Vintage Flowers Dies. First up, a card:

Hello

Truth time: I don't stamp too many floral multi-step stamps, and therefore I don't have go-to ink combinations. So, I played around with pretty much every dye ink I own and stamped several flowers. Okay, maybe 50. ;) Here are the inks I used (all combinations are from the darkest layer to the lightest layer):
  • Yellow: Hero Arts Butter Bar, Stampin Up! YoYo Yellow stamped off once, SU! Barely Banana
  • Pink: Hero Arts Pale Tomato, Hero Arts Pale Tomato stamped off once, SU! Pink Pirouette
  • Darker pink: SU! Strawberry Slush, Hero Arts Pale Tomato, SU! Pink Pirouette

I used the Vintage Flowers Stamps and Vintage Flowers Dies for the flowers and leaves. The dies make these flowers easy to use and are perfect for layering flowers. For the sentiment, I used the new Birthday Greetings set. In the background, I watercolored some stripes with a (ground-down) Silver Gelato.
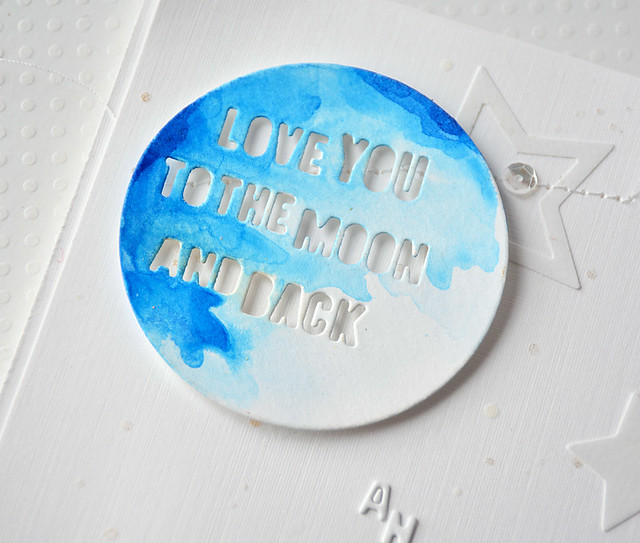
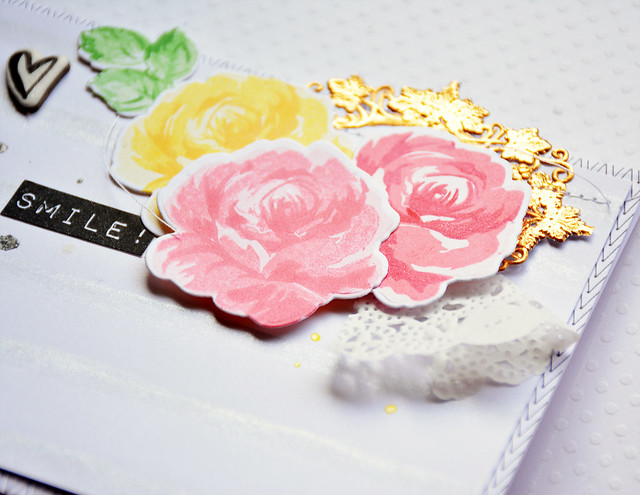
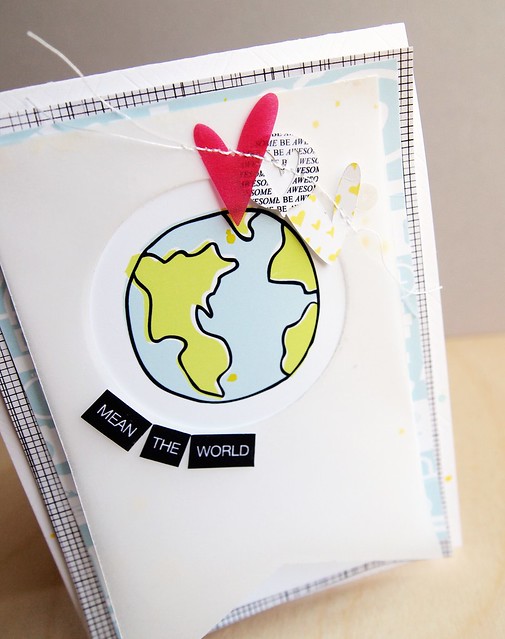
Here's a close-up:

Hello

See the gold Vineleaf Frame? I trimmed the inner layer of the frame, and now I have a second frame for a future project. :) This frame is a pretty rich-gold color that's so popular right now.  They're great for layering, or you could add a sentiment for a CAS card.

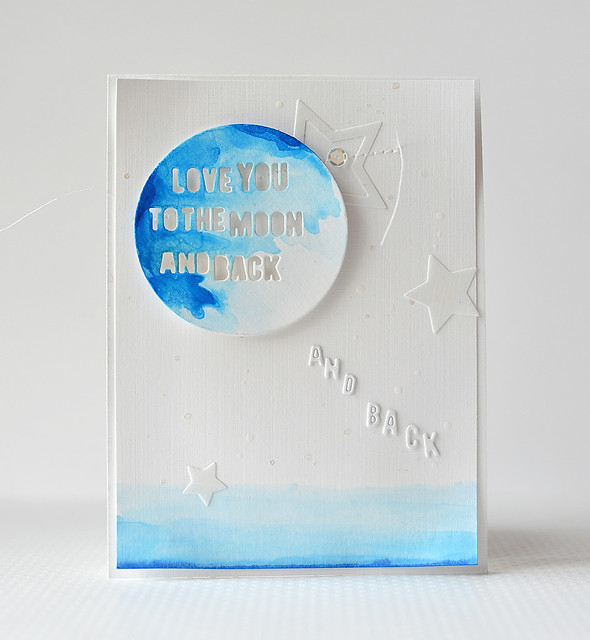
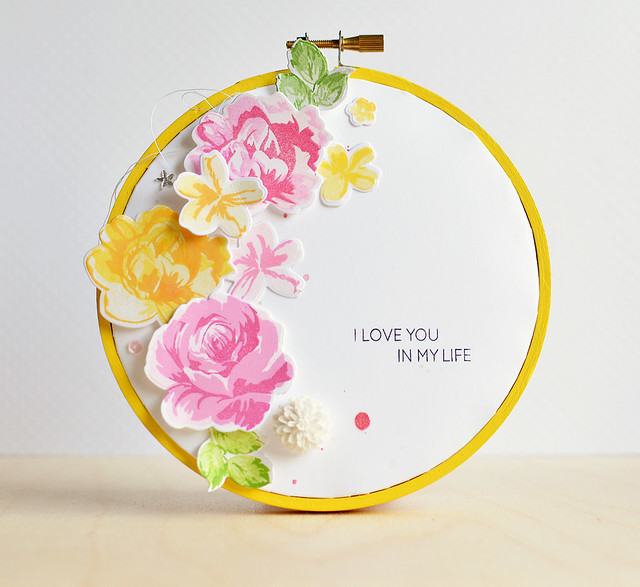
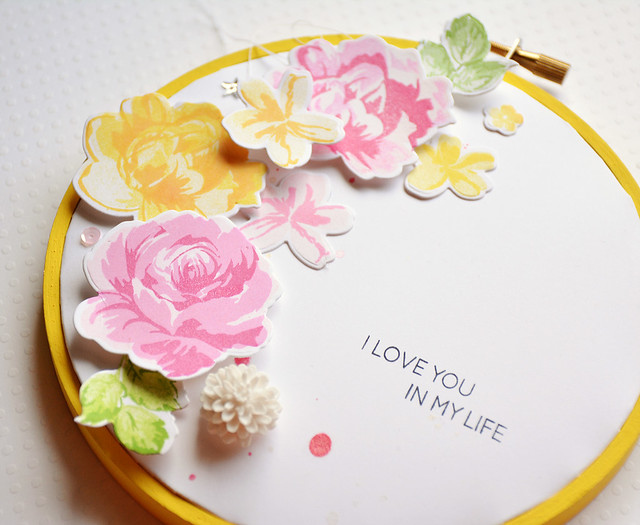
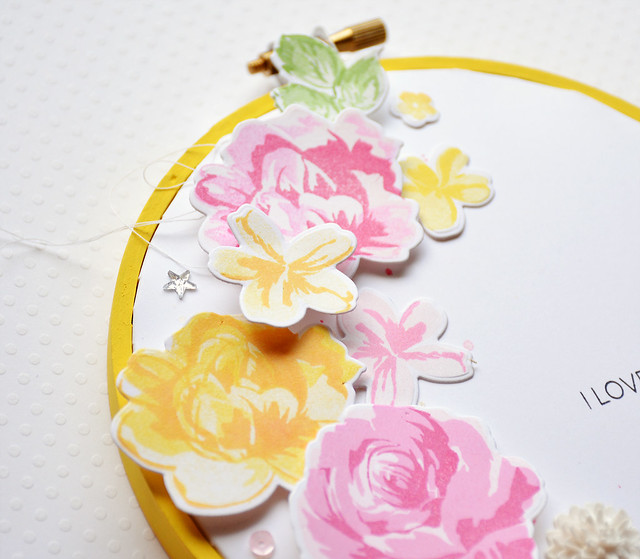
Next, I have an altered hoop:

I Love You In My Life

It's been a while since I've made a hoop, but I wanted to make one for my daughter. I used the same Vintage Flowers stamps and Vintage Flower dies for the flowers and leaves. For the sentiment, I masked off two sentiments from
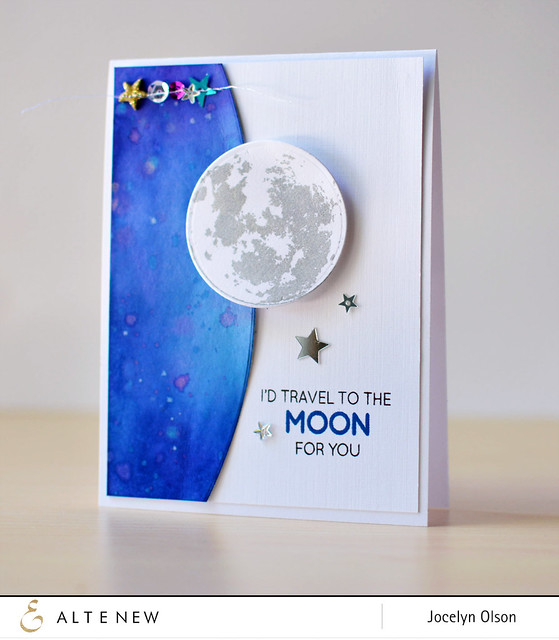
 To the Moon.

The ink colors I used here were:
  • Yellow: Hero Arts Butter Bar, Stampin Up! YoYo Yellow stamped off once, SU! Barely Banana
  • Pink: My Favorite Things Razzle Berry Hybrid, Hero Arts Bubblegum stamped off once, SU! Pink Pirouette

I Love You In My Life

I painted the hoop and then followed THIS tutorial for the background. Once I had the base completed, I added the die-cuts and a few embellishments. The flowers are so cheerful!

I Love You In My Life


Prizes: There are two ways to win!

To celebrate this release, Altenew will draw three winners who will each receive a $30 gift certificate to their online store. Please leave a comment on the Altenew blog by Friday, March 20th 11:59pm EST for a chance to win. The winners will be announced on Saturday, March 21st.

Altenew is also offering a $30 gift certificate for comments on this blog post. For a chance to win this extra gift certificate, please leave a comment on my post by Friday, March 20th at 11:59pm.

Thanks so much for stopping by! Next up on the hop is the incredible Marika. I'm sure you're in for a treat!


Friday, February 13, 2015

A Vitamix Would Have Been Easier

Hi everyone! Happy Friday!

Just a quick post to share some valentines I made for my daughter's class.

Fruit and Veggie Valentines

So back in December (for the January Paper Smooches release), I stamped, Copic colored, and die-cut about 35 fruits and vegetables using the Paper Smooches Fruitastic and Vegtastic stamps and Fruitastic Icons and Vegtastic Icons dies. Thankfully, I find coloring pretty relaxing. :)


Fruit and Veggie Valentines

I used a mix of Paper Smooches sentiments, from the Fruitastic, Vegtastic, and Woofers and Tweeters sets. For the background papers, I used the Scalloped Circle die.

Here's a close-up of my favorite--the carrot. Hee hee.

Fruit and Veggie Valentines

My daughter used them for her valentines, but these cards would work year-round--I kept a few for me to use. ;)

Tomorrow, I'll share the valentines I made for my son's class.

Have a great day!

Supplies
Stamps: (carrot, peas, sentiments from Vegtastic; strawberries, peach, orange, sentiments from Fruitastic; "I dig you" sentiment from Woofers and Tweeters) Paper Smooches
Dies: (vegetables from Vegtastic Icons; fruit from Fruitastic Icons; Scalloped Circle) Paper Smooches
Cardstock: (Doll Pink, Cotton Candy) Simon Says Stamp, (white) Papertrey Ink
Patterned paper: (Shimelle) American Crafts; (Love Notes) Crate Paper
Ink: (Melon Mambo) Stampin' Up; (Tuxedo Black) Memento
Copic markers

Friday, November 28, 2014

November Paper Smooches Design Team Blog Hop

Hi everyone! If you're in the U.S., I hope you had a great Thanksgiving!

It's also Pep Rally week and we are here today to share a sampling of the NEW Paper Smooches December release with you! FOUR new stamps and EIGHT new dies will be available to purchase on November 30th at 8:00pm PT. Once our release goes live, you will find our new products HERE.

To add extra fun to our blog hop...we are offering up a prize! 
The prize - a $25 gift code to choose what you like at the PS online storeHere are the details:
  • FOUR winners will be chosen at random from any of the design team blogs and the PS Blog to win the $25 prize. 
  • Just leave a comment on any of the design team blogs listed above or the PS blog for your chance to win (you do not need to comment on all blogs to qualify, but it increases your chances). 
  • Deadline: You have until midnight PT on Sunday, November 30th to leave a comment. 
  • Please check the Paper Smooches blog on Monday, December 1st to see if you are one of the FOUR lucky winners. 
Here's the order of the hop:
To increase your chance of winning:
  • Tell us that you Facebooked about our blog hop (leave another comment) 
  • Tell us that you Tweeted about the hop (leave another comment) 
  • Tell us that you posted on your blog about our blog hop (leave another comment) 
Here's my card using Lots of Love:


Lots of Love

The new Lots of Love set is perfect for Valentine's Day and any love card. I love the beautiful script--Kim's lettering is gorgeous! 


I die-cut the heart on my Cameo, watercolored the panel with spray mists, and then stamped over it using the Lots of Love sentiment. I went a little crazy with the watercoloring, but decided to go with the artsy look. ;) The flowers are from the new Lovely Thoughts set. I embossed the flowers on vellum and then watercolored over them.

Here's a close-up:


Lots of Love

I finished the card by die-cutting a scalloped base out of the Notes and Things paper. 

Thanks for stopping by! Next up is my sweet and very talented friend Kalyn!


Supplies
Stamps: (sentiments from Lots of Love; flowers from Lovely Thoughts) Paper Smooches
Cardstock: (Distress Watercolor Paper) Ranger; (vellum) PTI
Patterned papers: (Notes and Things 6x6) Crate Paper
Ink: (Versafine Onyx Black) Tsukineko; Versamark; (Picked Raspberry Distress Spray) Ranger; (Magnolia Magenta Gold; Salt Water Taffy spray mists) Lindy's Stamp Gang
Embossing: (Clear Fine embossing powder) Wow!
Die-cutting: (Cameo) Silhouette 

Monday, August 25, 2014

Hero Arts & A2Z Scrapbooking Digital Blog Hop

Hi everyone! I'm super excited and honored to be participating in a special blog hop today:


A2Z Scrapbooking will be the new Hero Arts digital retailer, and to celebrate the collaboration, we're having a blog hop. If you're just joining the hop, you can start at the Hero Arts blog.

I made a couple of cards using a few digital techniques. Here's the first one:


Hello Sunshine

I used the Sunshine Flowers cutting files and digital stamps. Instead of cutting the jumbo flower, I clipped a Just Jaimee digital patterned paper to it in Photoshop. If you wanted a one-layer card for mailing, the clipping technique is the way to go. The sentiment was die-cut on my Cameo out of white cardstock. I used two spray mists to watercolor a gradient on the die-cut.  

I added some splatter over the flower to give the flower some shimmer. 

Hello Sunshine

And yes, the sentiment is different in this card. I made a set of four cards and die-cut two of the sentiments and using the digital clipping technique for the other two. I'm fickle. ;) 

My second card is a little more masculine:

Written in the Stars

For this card, I used the Firmament set and a few different digital techniques. I started with a digital patterned paper and stamped the falling stars with the digital brush. Next, I stamped some of the sketchy stars, rotating the brushes and resizing them. 

After adding the sentiment from the same set, I printed two copies. I trimmed the stars out of one of the copies and added them on top for some more depth:

Written in the Stars


I also printed one of the stars on vellum and added it to the bottom corner. I love the added translucency of printing on vellum.  

Written in the Stars

As part of the hop, there's also a giveaway! A2Z Scrapbooking is giving away a $50 gift certificate to one lucky commenter. The winner will be selected from all comments on the blogs, so the more comments you leave, the better your chances. The giveaway ends on Sunday, August 31st at 11:59 ET.

Here's a list of the participants:

Thanks for stopping by! Next up on the hop is the fabulous Zoey Scarpelli!


Supplies
Hello Sunshine
Stamps: (flower from Sunshine Flowers) Hero Arts digital
Cardstock: (white) PTI; (Premium Matte Photo Paper) OfficeMax
Patterned paper: (digital Ice Cream Painted Paper from Just Jaimee) The Lilypad; (yellow from Jen Hadfield) Pebbles; (stripe) PTI
Die-cut: (sentiment from Sunshine Flowers) Hero Arts digital
Inks: (Pink Ginger, hot pink) Maya Mists

Written in the Stars
Stamps: (sketchy stars, falling stars, sentiment from The Firmament) Hero Arts digital
Cardstock: (white, linen vellum) PTI; (Premium Matte Photo Paper) OfficeMax
Patterned paper: (digital Stargazer paper by Dawn by Design) Pixels & Co.; (orange stripe from Jubilee) My Mind's Eye
Embellishments: (puffy stars from Daily Flash) October Afternoon; (sequins) Avery Elle
Dies: (stars from Large Holiday Shapes) Simon Says Stamp

Friday, August 15, 2014

Here We Go, Love

Hi everyone! Ready for the weekend? We start school on Monday--ack! I'm sad!

Nancy and I are on the Scraptastic blog today. We're both sharing projects using Scraptastic Club's August This Life Noted kit. Not long ago, I watched THIS awesome video by Jennifer McGuire. In it, she showed how to use wood veneer for faux letterpress, and I've been wanting to try that technique.

Here's the card I made using the LOVE wood veneer in the This Life Noted kit:

Woodgrain Love


You'll want to check out Jennifer's video to see the tutorial. I shared a few pictures on the Scraptastic blog, too. I did some gradient inking on the back of the wood veneer and ran it through my Big Shot. Usually when I try new techniques, they look pretty rough compared to the demo. This time, the technique worked easily. Yeah!

Here's a close-up:


Woodgrain Love

I layered two of the journaling cards and added one of the Cut-Aparts and the black-and-white sticker from the kit. The red patterned paper layered underneath is from the Boys of Summer kit.

Here's a close-up of the layers:


Here We Go

The August This Life Noted kit is sold out, but you can still get the August Wood Veneers to try this technique. Be sure to check out Nancy's take on the kit (it's cool!) on the Scraptastic blog.

Thanks so much for stopping by. Have a great weekend!


Supplies
Cardstock: (white) PTI
Kit: (August This Life Noted kit) Scraptastic Kit Club
Ink: (Mango) Fresh Ink; (Fizz) Avery Elle; (Apple) Mama Elephant; (Black, Opaque White Mister Huey's) Studio Calico

Friday, May 30, 2014

You & Me

Hi everyone! Any big plans for the weekend? With my husband out of town, my in-laws helped out with some yard work yesterday. My kids discovered yesterday that they like to do weeding. I'm really excited about that! LOL!

I wanted to share a final card from the Scraptastic Club May release:

You & Me


I started by watercoloring the background to match the top journaling card. I then used the stamps in the May 2014 This Life Noted Stamp Set to stamp the days of the week. The layers are three journaling cards from the May This Life Noted kit, along with the silver tab, Cut-Aparts, and one of the kit labels.

I finished the card with some sequins from the same kit (LOVE their sequins!). Here's a close-up:


You & Me


The May kit is sold out, but here are some peeks of the June kits:


Awesome right? They have so much product--it's a fabulous deal! If you would like to buy one of these kits, they will go on sale at midnight ET on June 1st. You can find them HERE (after June 1).

Thanks so much for stopping by! Have a great weekend!


Supplies
Cardstock: (white) PTI; (Distress Watercolor) Ranger
Patterned papers: (May 2014 This Life Noted Kit) Scraptastic Club
Stamps: (May 2014 This Life Noted Stamp Set) Scraptastic Club
Inks: (Provincial Grey) Fresh Ink
Mists: (Letterman's Jacket Mister Huey's) Studio Calico; (Lemon Zest) Tattered Angels; (Georgia Peach) Heidi Swapp


Thursday, May 1, 2014

Paper Smooches May DT Blog Hop

**For my Scraptastic Club May release post, please click HERE. 

Hi everyone! Eek! It was exciting to type that "DT" post title! :)

It's Pep Rally week and we are here today to share a sampling of the NEW Paper Smooches May/June release with you!  FOUR new stamps and EIGHT new dies are now available to purchase. You will find our new releases HERE
To add extra fun to our blog hop...we are offering up a prize! 
Since Paper Smooches is working along side of Xyron adhesives this week, they have a special prize to offer one random winner as well.  The prize is worth $100. To see a photo of the prize, please visit the PS blog.  You can visit the Xyron blog  to see what their fabulous team has created with our PS products.  While you are there, you will have a chance to win a $20. gift code to win some PS products!  
  • FOUR winners will be chosen at RANDOM from any of the design team blogs and the PS Blog
  • The prize - a $25. gift code to choose what you like at the PS online store.
  • Just leave a comment on any of the design team blogs listed below or the PS blog for your chance to win!  (you do not need to comment on all blogs to qualify but it increases your changes) 
  • You have until midnight MT on Sunday, May 4th to leave a comment. 
  • Please check the Paper Smooches blog on Monday, May 5th to see if you are one of the FIVE lucky winners.  (four PS winners and one Xyron winner)

To increase your chances of winning:
  • Tell us that you Facebooked about our blog hop
  • Tell us that you Tweeted about our hop
  • Tell us that you posted on your blog about our blog hop
(which means that you have up to three extra chances to win on each blog)
Here's my card using the Kitschy Kitchen stamps and Kitchen Icons dies:

We Mix Well

The rolling pin, jar, and sentiment are from the new Kitschy Kitchen stamps, and I used the Kitchen Icons dies for the rolling pin and jar. I added the "F" from the Mini Monograms set to make the jar look like a flour canister. I did want to point out that the bottom of the jar is solid, but I trimmed a piece of paper to cover the black area.

For the paper piecing and layered papers, I used digital papers from Sahlin Studio and Paislee Press (yep, it's a hybrid card).  I added a few hearts from the Paper Smooches Hearts dies. Here's a close-up:


We Mix Well Close-Up


I used the Xyron Adhesive Dots to attach the flour jar and paper layers. These dots are super strong! They reminded me of the old Super Glue commercial with the guy in the hard hat hanging from the i-beam (anyone remember that commercial??). Those die-cuts are staying put even through the mail--love that. :)

Thanks for stopping by! Next on the hop is my talented and sweet friend Kalyn.


Supplies
Clear stamps: (rolling pin, jar, sentiment from Kitschy Kitchen); ("f" from Mini Monograms) Paper Smooches
Cardstock: (white, Linen Vellum) PTI; (white woodgrain) Simon Says Stamp
Patterned papers: (floral, yellow, gingham, red with flowers from Pure Happiness) Sahlin Studio; (pink stripe from About Us) Paislee Press
Dies: (rolling pin, jar from Kitchen Icons dies), (Hearts Dies) from Paper Smooches; (circles and large heart) Silhouette America
Other: (enamel dot) My Mind's Eye; (doily) Wilton

Saturday, April 26, 2014

Shake Your Love

Hi everyone! Is anyone else singing the Debbie Gibson song in the title? hee hee


I wanted to join in the Sequin Shaker Blog Hop and share a project I made for i {heart} papers. I pretty much stink at shaker cards, but I figured it's all for fun, right? :)

Here's what I made:

Shaker Love

I've only made shakers that pop up, but I was inspired by how Julie Ebersole sewed around the border of her shaker card HERE. I sewed around three sides of the Crate paper and acetate. I filled the pocket with a mix of Theresa Collins, Lawn Fawn, and sequins from my stash as well as vellum "LOVE" die-cuts.

For the top, I layered more papers and used the negative portion of the LOVE from Avery Elle's Words Fill in the Blank Dies. For adhering the letters before I stitched, I used a glue pen--I like that it does't muck up my sewing machine needle. :) Here's a close-up:


Shaker Love


If you'd like to join in the Sequin Shaker Hop, you can check it out HERE.

I hope your weekend is off to a good start. :) My husband and I are going out on a date night tonight for our 14th anniversary (this past week). Yeah!

Thanks for stopping by! Have a great weekend!


Supplies
Cardstock: (White, Vellum, Acetate) PTI
Patterned paper: (Oh Darling) Crate Paper
Dies: (Word Fill in the Blank) Avery Elle
Sequins: (Lawn Ornaments Hello Sunshine) Lawn Fawn; (pink, yellow) Avery Elle; (Daily Stories sequins) Theresa Collins

Saturday, February 22, 2014

Spring Love

Hi everyone! I hope your weekend is off to a great start! I'm getting over some type of flu and a bad case of pink eye--ugh. Fortunately, my eye is starting to clear up, and hopefully it won't move to my other eye. :)

A couple of weeks ago, I had some tags posted on the Glitz Design blog, but I never shared them here. The tags were for Valentine's Day for my kids' teacher treats. They're so springy, I think they could work after Valentine's Day, too.

Here's one:

Spring Love Tags


I used digital papers from the Finnley (green), Wild and Free (yellow), and Hello Friend (pink) digital collections from Glitz on the tags. I increased the saturation of the papers to make them brighter. I die-cut the postage stamps on my Cameo, the hearts with Paper Smooches dies, and the mini Polaroid with a My Favorite Things die.

I made six tags--one for each teacher:


Spring Love Tags


For each tag, I layered some Glitz Design washi tape, tissue paper (there it is again--I'm addicted!), part of a doily, and my papers. I topped off each one with the "xoxo" from the brand new Glitz Black & White collection. I added a little white splatter on top....I was holding my breath that I wouldn't have a huge glob of ink in the center. ha ha

Each tag is a little different:

Spring Love Tags


They were so much fun to create!

Thanks for stopping by! Have a great day.


Supplies
Cardstock: (White Linen) Ellen Hutson
Digital elements: (green papers from the Finnley element pack 2; yellow papers fro Wild and Free paper pack; pink papers from the Hello Friend paper pack; sentiment from the Black and White element pack 2) Glitz Design at Jessica Sprague
Washi: (Hello Friend) Glitz Design
Dies: (tag, postage stamps) Silhouette America; (Hearts Dies) Paper Smooches; (Precious Polaroids) My Favorite Things

Tuesday, February 4, 2014

Kinda Like You A Lot

Hi everyone!

This week on the Glitz blog, we're using a color theme--pink, silver, and/or gold. I wanted to use pink and silver, and since silver is kind of hard with digis, I used some light greys. I went through ALL of my Glitz files and pulled out anything pink or grey. There were quite a few, and it's nice how many of the Glitz pinks match. :)

I don't know about you, but I don't typically make Valentine's for my friends--well, not since I was a kid. I make them for my husband and my kids' classmates, and I'm usually done by that point. This year, I decided to make some for friends.

Here they are:

Kinda Like You Set J. Olson


I started by using a Simon Says Stamp stencil and embossing paste for two of the cards, and adding mists to the other two cards. I printed off, fussy cut, and die-cut the different papers and elements. Digital is handy for making card sets...I didn't have to buy multiple packs of die-cuts. 

This one was my favorite:

Kinda Like You Set J. Olson


I took a digital sentiment from Glitz Design's Sunshine in My Soul and opened it in Silhouette Designer Studio. I traced around the letters and added a heart from Lori Whitlock. 

Here are the rest of the cards:

Kinda Like You Set J. Olson


For the Life is Beauty Full card, I used sentiments from Love You Madly (recolored) and Beautiful Dreamer. The "you are my sunshine" is cropped from the full verse, and I adjusted the hue a bit.


Kinda Like You Set J. Olson

I layered the doily, heart, and sentiment from the Love You Madly collection. I love this collection! That grey woodgrain is from the Raven collection. Yep, a Halloween collection, since that's how I roll. :)


Kinda Like You Set J. Olson


This last card is similar to the first, but I backed it with the grey and white polka dot. I love that little arrow from the Wild and Free elements!

What about you--are you making any Valentine's this year? 

Thanks for stopping by! Have a great week.


Supplies
Cardstock: (white) PTI; (glitter cardstock) Best Creations
Digital elements: (Love You Madly full collection, Yours Truly paper pack, Pretty in Pink paper pack, Yours Truly element pack 2, Finnley element pack 2, Wild and Free element pack 2, Sunshine in My Soul element pack, Raven element pack 2, Beautiful Dreamer element pack 1) Glitz Design at Jessica Sprague
Dies: (small hearts from Large Holiday Shapes) Simon Says Stamp, (large heart from Limitless Layers Hearts, Tag Sale #4) PTI
Stencil: (Falling Hearts stencil) Simon Says Stamp
Cutting Files: (wonky heart from Sugar Rush Love You) Studio Calico
Twine: Lawn Fawn
Embossing paste: Wendy Vecchi


Sunday, February 2, 2014

Sunday Sketch

Hi everyone!

Last weekend, as we were driving across the state for a weekend trip, I got a message from Kelly Noel at Studio Calico. She asked me if I would do the Sunday Sketch on their blog? Um, yes!! I was pretty much thrilled to pieces. :)

You can read more about my projects on the Studio Calico blog, but I wanted to share the photos and close-ups.

Here's the first one:

Sweetie Pie

I followed the sketch, but instead of strips of papers, I stitched the lines. I used the Studio Calico Copper Mountain Card and Project Life kits as well as Printshop papers. The cute frames are from My Favorite Things.

Here's a close-up:

Sweetie Pie

There are a lot of details! LOL!


Here's the second card:


You Mean the World

The card is almost all digi/hybrid. Almost every element is stamped (using the SC Sugar Rush Project Life stamps), including stamping patterned papers for the yellow/white and "be awesome" hearts.

Here's a close-up:

You Mean the World


Thanks for stopping by. If you get a chance, please stop by the Studio Calico blog and check it out. You can play along, too. :)

Have a great rest-of-the-weekend.


Blog Design by Caked Designs