Showing posts with label Paper Crafts. Show all posts

Wednesday, December 3, 2014

Paper Crafts & Scrapbooking Special Thanks Blog Hop

Hi everyone! I have a special (but sad) post today.


Today, 200+ people are hopping to say thanks to the staff at Paper Crafts & Scrapbooking Magazine. If you're hopping along, you should be coming from Susie's blog.

For those who don't know, Paper Crafts will have its last issue in February 2015. Since the announcement, I've thought about what to say. Ultimately, it comes down to thank you. Thank you for being such an influence on the papercrafting community. Thank you for your hard work and the love you poured into issues. Thank you for being awesome people who made people smile every day.

Kerri does awesome "What I've learned from..." posts on Paper Crafts Connections. I did a little reflecting on what I've learned from Paper Crafts & Scrapbooking over the past several years:

  1. Go for it.  'Nuff said.
  2. It's good to try new techniques. It's hard to fall into a rut when you have calls pushing you to try using hardware or string art or acrylics. 
  3. What not to wear. I really should say what is "in" to wear. PC&S has always been cutting edge on spotting trends, and reading the issues/calls made me feel almost cool. 
  4. Freestyle/collage is a real life style. I want to put seven unrelated embellishments on a card? That's okay! 
  5. Barbie shoes don't make great stamps. Yes, I've tried that. And celery. And corn. My husband thought I was completely nuts when I told him I had to go to the grocery store for a call. Believe me, I would never have tried those techniques if it hadn't been for PC&S, but trying something new is good. :)
  6. Gallon, quart, and pint is more than just for paint. The Card Design Handbook? Life changing. 
  7. It's more than a magazine. The editors and staff, the blogs, the contests, the challenges--it's such a sense of community. These folks are social media gurus!
  8. They are teachers. When I had a DT end, Susan and Jennifer took the time to give me some great advice. They taught me a lot about myself. 
  9. Rocky Road is good. The PC&S editors were very supportive of different styles, different supplies, and different techniques. I dug that (like I dig Rocky Road ice cream). 
  10. Crafty friends are good friends. I've met fabulous friends through PC&S, and I know I'm not the only one. :)
Thank you, Jennifer, Susan, Stacy, Kerri, Holly, Matt, Melinda, and (honorary) Cath for all that you have done.

I also wanted to share a card:

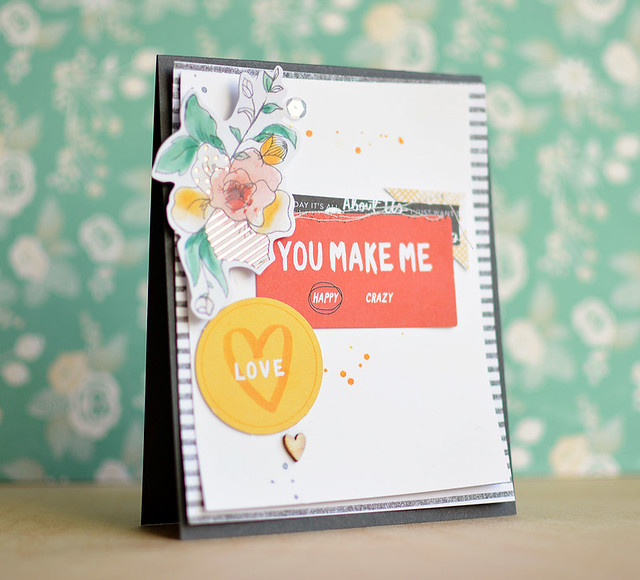
You Make Me Smile


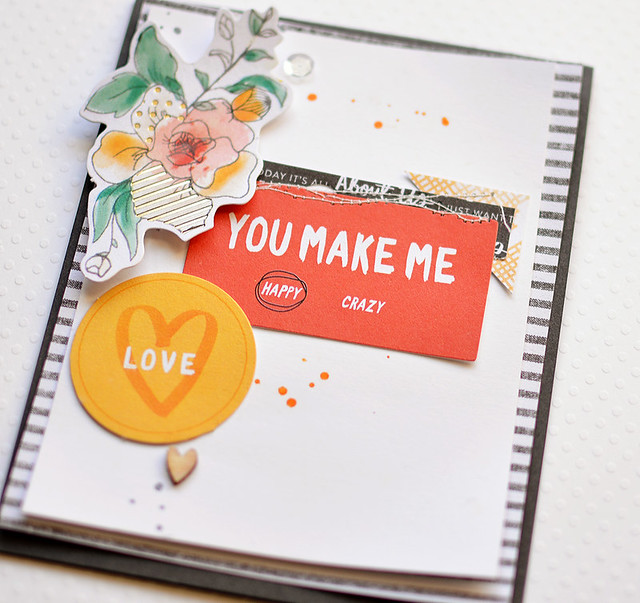
I used the pretty new Amy Tangerine Stitched collection to make a very scrappy card. Here's a close-up:

You Make Me Smile


Lastly, I wanted to link up to the PC&S Farewell Slideshow. (Awww....)

Thanks for stopping by. Next up in the hop is Chaitali!

Tuesday, January 21, 2014

Just for You + A Video

Hi everyone!

I wanted to share a card that was published in Paper Crafts & Scrapbooking Magazine's January issue (yeah!). You can find the issue HERE.

This card was in the triangles section of the issue:

Just for You


I started by making my own paper digitally (the diamonds) using a 4x6 Photo Template no. 2. I added the cake die-cut from Ruby Rock-It and stamped the Hero Arts sentiment.

I thought the Lucky Charm tiny triangles didn't quite match the diamonds, so I added vellum to soften it. Here's a close-up:

Just for You Close-Up


I made a video that shows how to use digital templates. It wasn't the same process I used on this card (there were a few more steps), but I used the same template. As a forewarning, the patterned paper I made in the end was pretty ugly. LOL!


(Please click on the YouTube icon to watch the video in HD.)


Thanks for stopping by! Have a great day!


Supplies
Cardstock: (Rustic White) Papertrey Ink
Patterned paper: (pink and cream triangles from Lucky Charm 6x6 pad) American Crafts
Clear stamps: (sentiment from All Occasion Messages CL272) Hero Arts
Ink: (Wet Cement Mid-Tone ink) Hero Arts; (White) WPlus9
Accent: (coral pearl) Doodlebug designs; (cake ephemera from Cook It collection) Ruby Rock-It
Digital element:  (triangle template from 4x6 Photo Templates no. 2) Designs by Lili at The Lilypad; (digital overlay from Textured #20) Mommyish at SugarHill Co
Fibers: (white lace; pink/yellow ribbon) May Arts


Friday, October 4, 2013

WCMD Blog Hop

Hi everyone! I'm on the road for work and doing observations in middle schools. Phew! Those teachers need a serious pay raise. I was exhausted just observing. ;)

Before I left, I got a message from Holly about a Paper Crafts Magazine's blog hop. Yeah!


Yep, it's a blog hop for last year's World Card Making Day winners. Here's the list of last year's winners (and the blog line-up):
 Jocelyn Olson <--You are here


As part of the hop, we're supposed to make a card in the same category as our winning card. Mine was in the love category (you can see it HERE). I still smile ear-to-ear when I think of the e-mail from Holly telling me I was one of the winners. It was such an incredible feeling. :)

Here's my new love card:


Several months ago, I bought the You Are Loved digital journaling cards from Paislee Press. I loved them, but I never got around to using them (I'm not the only one who does that, right??). The chalkboard is longer than a standard journaling card. I resized one of the cards slightly smaller and duplicated the card....5 times to be exact. I layered the journaling cards under each other and used a bit of blurring and the clone stamp in Photoshop to remove any lines between the layers.

After I printed the panel, I layered this fab vellum from Cosmo Cricket and some twine. Here's a close-up:


We were also asked to give a tip or advice. Hmmm...I'm not sure that I have any earth-shattering advice for entering WCMD. I will say that while my card last year did have a sentiment that (clearly) fit in the love category, it was different than "I love you." Honestly, though, I don't have a secret formula for you--I wish! ha ha I hope you enter cards to this year's WCMD contest!

Paper Crafts has several events going on to celebrate the day. You can check out the WCMD page HERE.

Thanks so much for stopping by! Next on the hop is fantastic Kerrianne.


Supplies
Cardstock: (White Linen) Ellen Huston; (Premium Matte Photo Paper) OfficeMax
Other paper: (vellum from Simple Surfaces) Cosmo Cricket
Digital element: (journaling card from You Are Loved) Paislee Press at The Lilypad
Twine: (yellow) Divine Twine


Sunday, July 21, 2013

You Light Up My Life

Hi everyone! Okay, after writing that title, now I'm singing some Debby Boone (anyone else humming it, too?).

On that note (yuck, yuck), it's time for a new Paper Smooches SPARKS Picture Perfect challenge. Here's this week's inspirational picture:


I focused on the sun and colors (and now that I look at the image again, the ocean too) for this card:


I  used stamps from three different Paper Smooches sets for this one-layer card (well, one layer plus the yarn). Since my card uses the masking technique, I'm linking up to Savannah's challenge at Do More With Less. I'm also linking up with the Paper Crafts Magazine July Gallery Challenge.

I started by stamping the waves from Wicked Nauticool repeatedly to create a horizon. I masked off the water and stamped the boat from the same set. I created a mask for the boat and stamped the circle from Off the Charts to create the sun--this stamp is going to be my go-to for a sun from now on. I finished the stamping with the sentiment from Smoocheroos.

Here's a close-up:


After I finished the stamping, I went to work on the coloring. I colored the sailboat with Copics. For the water, I used Distress Inks and a couple of spritzes of Pearl spray mist, and I watercolored. I like the mottled look for water, and the Pearl looks cool in the light:


Ready to play along with the SPARKS challenge? You can link up your Paper Smooches projects based on the inspiration picture HERE.

Thanks for stopping by! Have a great week.


Supplies
Cardstock: (white) PTI
Clear stamps: (sailboat, waves from Wicked Nauticool; sun from Off the Charts; sentiment from Smoocheroos) Paper Smooches
Ink: (Sky Blue, Sunflower Yellow Brilliance Ink; Tuxedo Black) Tsukineko; (Tumbled Glass, Broken China, Stormy Sky Distress Inks) Ranger; (Pearl spray mist) Tattered Angels
Copic markers
Yarn: May Arts

Friday, July 12, 2013

Paper Crafts' Birthday Creations Blog Hop

Hi everyone! If you're looking for my CAS-ual Fridays post, you can find it HERE.

Today is the Paper Crafts Magazine's Birthday Creations vol. 3 blog hop (woo hoo!).


I'm so happy to be participating! There are some crazy-talented ladies in the hop:

Jocelyn Olson <--You are here

For the hop, we're supposed to make a birthday card based on one of the three sketches found in the issue. I picked Kim Kesti's sketch:

I went round and round whether to do negative die-cuts, stamping or something else. Finally, I decided to make a card for my mom's 70th birthday party in a few weeks. My mom is an avid quilter, so I used the inspiration for this card:


I made a similar card last year (HERE) using the same Dresden Plate die-cutting file. I started by stamping the sentiment from CAS-ual Fridays Stamps onto some lightly patterned paper. 

Next, I die-cut two different sizes of the Dresden Plate files. I ended up with four different paper companies, but I liked the patterns together. When I adhered the plates, I off-set them slightly to show a little more of the quilt pattern. Here's a close-up:


Now the stitching...truth be told, I was only going to sew a border. In the moment, I decided to sew around the circle centers. I did a good job on the top one, but the bottom one--yikes! I made the best of it by going around the card a second time with some wonky stitching to make the mistake look like part of the card. ;)

There are tons of great ideas for birthday ideas in this issue and lots of jaw-dropping projects. Want to win a copy? You can leave a comment here and leave comments on each of the other blogs by Tuesday, July 16th. Or, if you can't wait, you can buy a copy of the issue HERE.

If you make a birthday project or a mixy-matchy project, be sure to link up to Moxie Fab World's challenges. :) I'm linking my card up to the Mixy-Matchy Style Challenge and the Birthday Card Challenge. 

Thanks so much for stopping by! Next up in the hop is the fabulous Angeline.


Supplies
Cardstock: (Kraft) PTI
Patterned paper: (background--Cloud Cream from Cool Summer) Carta Bella; (music notes from Lucky Charm) Dear Lizzy/AC; (yellow damask from Sweet Girl) Echo Park; (other papers from Atlantic collection) Studio Calico
Clear stamps: (sentiment from Casual Elegance) CAS-ual Fridays Stamps
Ink: (Crumb Cake) Stampin' Up; (Antique Linen Distress Ink) Ranger; (Unicorn) Hero Arts
Die-cutting file: (Dresden Plate) Silhouette

Monday, June 24, 2013

Gallery Idol Round 5

Hi everyone! Every time I think about making it to the Top 5 at Paper Crafts Magazine's Gallery Idol contest, I want to jump up and down. :) Thank you for your support!!


The challenge for Round 5 was to make four cards in four different card styles using coordinating colors. Phew! It was a CRAZY weekend working on cards. I got very little sleep all weekend, but in the end, I perservered and made four cards I'm proud of.

I found a color scheme from The Sweetest Occasion that I used for all of the cards:


For my four card styles, I picked Fun/Cute, CAS/Graphic, Shabby Chic/Vintage, and Freestyle/Collage. If you have any questions about what I did, feel free to drop me an e-mail. :)

First up is the Fun/Cute card:


Oh, he just cracks me up (or quacks me up, as my 7-year-old would say). Here are a few highlights about the card:
  • The duck (Starving Artistamps) and hat (Lawn Fawn) were colored with Copics and fussy cut (those legs were tough!)
  • I made the speech bubble digitally and masked off and stamped the sentiment (CAS-ual Fridays)
  • I didn't have the right patterned papers, so I made my own. I made the gingham patterned paper in Photoshop using a template. I also altered the polka dot paper digitally--it was yellow on yellow--but I wanted to bring in the aqua.
Here's a close-up:


Next up is the Clean and Simple/Graphic card:


This style is definitely in my comfort zone. While I normally make a lot of CAS hybrid cards, this card doesn't have any digital elements. Here are a few highlights:
  • I die-cut the Memory Box heart six times and filled in the the negative space in the white die-cut with the various coordinating colors.
  • Since the card is graphic, I went with fully-saturated colors instead of patterned papers like the other styles.
  • I finished the card with a sentiment from Technique Tuesday. 

Here's a close-up:


Next up, is the shabby chic/vintage card:


I'm not going to lie, shabby chic does not come naturally for me. I wanted to take on the challenge and did a lot of homework studying blogs and back issues of Paper Crafts.

This vintage image made me laugh (is the mom in the back seat and the kids are in the front seat??). I thought the cheekiness reflected my style well. Here are the details:
  • The vintage circle (Pretty Little Studios) and sentiment are both digitally created. I altered the colors in the illustration slightly to reflect the coordinating colors.
  • I altered the scalloped Chic Tags die cut by flipping it over and misting the backside. I also whitewashed the wooden tag. 
  • I used six different patterned papers from four different manufacturers (SEI, Webster's Pages, Fancy Pants, and BasicGrey). 

Here's a close-up:


Lastly, I made a Freestyle/Collage card:


This card was the most fun to put together. :) Here are a few details:
  • I altered three of the embellishments with paint (the flower and wood veneer mini frame) and spray mist (the canvas oval).
  • There were twelve unrelated elements on the card (misting, stitching, die-cut patterned papers, sticker sentiment, metal flower, wood veneer frame, canvas oval, metal clip, and sequins).
Here's a close-up of the collage:


As part of the Gallery Idol contest, there's a final vote for the winner. If you like my cards, I would *really* appreciate it if you would take a moment to vote for me. You can click on the link at the top of the sidebar or go HERE, click on my cards, and vote. You do have to register, but if you have already registered, you can simply long in. Making it to the Top 5 feels like I've already won. But, winning would be the icing on the cake. :)

I wanted to throw out a special thank you to my husband and my in-laws for watching the kids and the moral support during the Gallery Idol contest. Thank you to everyone who has voted for my cards, given advice, and been a great listening ear. I have the best crafty friends! It's been such an honor to be in this contest. 

Thank you so much for stopping by!!

Supplies
Let the Shenanigans Begin!
Cardstock: (white) PTI
Clear stamps: (duck “Squirt”)Starving Artistamps; (sentiment from Shenanigans)CAS-ual Fridays Stamps; (hat from Hats Off to You) Lawn Fawn
Digital elements: (gingham from Patterns vol. 7) Wishing Well Creations at Sugar Hill Co.; (polka dot paper from Maritime collection) One Little Bird at The Lilypad; (speech bubble from Blah Blah Blah) Splendid Fiins at The Lilypad
Embellishments: (Whipped Cream button) My Favorite Things

Thank You For Simply Being You
Cardstock: (white; Aqua Mist) PTI; (dark orange, orange, yellow, grey) Bazzill
Clear stamps: (sentiment from Studio AE This One) Technique Tuesday
Die: (La Rue Heart) Memory Box

The Adventure Begins
Cardstock: (Aqua Mist) PTI
Patterned paper: (orange and red stripe from Vanilla Sunshine collection) SEI; (triangles, arrows, honeycomb from Composition and Color) Webster’s Pages; (polka dot from Hopscotch) Fancy Pants; (clouds from Serenade collection) BasicGrey
Paint: (Picket Fence Distress Ink) Ranger
Ink: (Dewey spray mist) Mr. Huey’s; (Antique Linen Distress Ink) Ranger
Embellishments: (scalloped tag) Chic Tags; (stickpins from Fact or Fiction) BasicGrey; (wooden tag) Maya Road; (scalloped ribbon from Mistables collection) Pink Paislee
Digital elements: (vintage circle ephemera) Pretty Little Studios

This Little Light of Mine
Cardstock: (white woodgrain) Simon Says Stamp
Patterned papers: (Sweet Composition) Allison Kreft at Webster’s Pages
Ink: (Tangerine Metallic spray mist) Maya Mists; (Letter Jacket mist) Mr. Huey
Stickers: (sentiment strip from The Sweetest Day) My Mind’s Eye
Embellishments: (mini wood veneer frame) Maya Road; (metal flower) BasicGrey; (metal clip from Fact or Fiction) BasicGrey; (orange sequin) Avery Elle; (silver sequin) Kelly Purkey at Simon Says Stamp; (canvas oval) BasicGrey
Dies: (Tag Scallop Die) Paper Smooches; (Jumbo Fishtail Banner) My Favorite Things
Other: (craft paint)

Monday, June 17, 2013

You Get Me

Hi everyone! Eek! I still cannot believe I'm in the Top 10 of the Paper Crafts Magazine's Gallery Idol contest. Thank you!!


The challenge for Round 4 was to use exactly 10 embellishments on a card. While it was definitely a challenge, I was excited about this theme. I knew right away I wanted to make another freestyle/collage card (like THIS card or THIS card). 

I decided to focus on a color scheme. It took a while to choose the colors, but I settled on this color scheme from The Sweetest Occasion. I focused on the three colors on the left.

I don't have too many embellishments in mustard, grey, and poppy, but I decided to alter some of the embellishments to get the right color. Here is a shot of embellishments before I altered them (there are a couple in the picture I didn't end up using):


I pulled together ink, spray ink, alcohol inks, spray paint, craft paint, glitter cardstock, and stamps, and I went to work altering the items. When I got done, my card looked like this:


I started with the background paper. To make it, I simply made a grey rectangle in Photoshop, duplicated it, and layered the rectangles to make stripes. 

For the embellishments, I focused on shapes and textures. I would have loved to have added two more elements, but I needed to stick to the 10 items. :) Here is what I used:

               1. Keyhole--spray painted and layered silver glitter cardstock underneath
               2. Canvas circle--(it wasn't the right color of yellow) flipped over and misted with Mr. Huey's Taxi
               3. Wood veneer heart--painted white and inked with a reinker
               4-5. Two half-circle chipboard pieces--painted silver
               6. Metal star--spray painted
               7. Ephemera heart die-cut--flipped over and stamped with Hero Arts Houndstooth background stamp
               8. Silver sequin
               9. Yellow transparency banner
               10. Hemptique twine

I have to share that the transparency banner was not what I had planned. I had a similar one, but just before I adhered it to the card, I lost it. Argh!! After spending 20 minutes looking for it, I gave up and cut down a different transparency. I'm sure it will turn up in a Lego bucket or something. ;) 

Here's a close-up:


Before I layered the elements, I created a sentiment strip. Using a sentiment from Pixel's & Co., I printed the sentiment on vellum. I could have easily printed the sentiment directly onto the paper, but I liked the softness of the vellum. Here's a close-up:


As part of the Gallery Idol contest, there's a vote for the Top 5. If you like my card, I would really appreciate it if you vote for my card! You can click on the link at the top of the sidebar or go HERE, click on the image, and vote. You do have to register, but if you have already registered, you can simply log in. Thank you so much!!

Thank you for stopping by and for your support! Have a great week!

Supplies
Cardstock: (white) PTI; (silver glitter cardstock) Doodlebug Designs
Other paper: (Premium Matte Photo Paper) OfficeMax; (vellum) 
Pigment ink: (Provincial, Strawberry) Fresh Ink
Spray ink: (Taxi) Mr. Huey's
Embellishments: (half circle chipboard from Mint Julep collection) BasicGrey; (transparency from Fact or Fiction ephemera) BasicGrey; (die cut heart from Dear Lizzy) American Crafts; (canvas circle from Fact or Fiction) BasicGrey; (metal star from Basics) BasicGrey; (keyhole) Hobby Lobby; (heart veneer) Simon Says Stamp; (sequin) Hobby Lobby
Fibers: (red twine) Hemptique
Digital elements: (sentiment from In Good Company collection) Pixels & Co.
Other: (Picket Fence Distress Paint) Ranger; (yellow spray paint, silver craft paint)

Monday, June 10, 2013

Be Your Own Kind of Wonderful

Hi everyone! Thank you, thank you for your votes for my Paper Crafts Gallery Idol Round 2 card. I made it to the Top 15!


I'm moving on to Round 3, and the challenge this time was to make your own stamped background. I'm not going to lie...when I saw this theme, I was pretty anxious. The last time I created my own stamped background that was not in Photoshop was...well, I can't even remember. But, I kept reminding myself that it's just stamping, and I do that. :)

Before I share the process, I wanted to show you the final card:


Last Friday after I saw the theme, I flipped through my inspiration files and stamps. I was inspired by THIS picture. I found a circle stamp from the Simon Says Stamp Circle Friends set, and began picking the colors.


I'm a little ashamed to admit that the sheet above was one of five test sheets to pick the colors--I must have tried about 50 inks. The blues, green, and yellow look summery to me, and I like how they looked when they overlapped.

I moved on to stamping the background. There was some testing to figure out the amount of overlap needed (seven lines overlapping for the rows and three lines for the columns in case you were curious). To make the lines straight, I used a stamp positioner. Even with that tool, I held my breath every time I stamped. ;) Here's what the sheet looked like when I was done:


Doesn't it look like a quilt? You can see in the top left where I dropped my block at the end of stamping (argh!!).

After all that work, I used a CAS design. Here's a close-up:


I used a digital brush for the frame around the sentiment from Rhonna Designs and typed in the sentiment. I added a tiny die-cut star using the Holiday Shapes die (love that die!). The card was finished off with a strip of the same aqua glitter cardstock at the top and some Caribbean twine from The Twinery.

As part of the Gallery Idol contest, there's a vote for the Top 10. If you like my card, I would really appreciate it if you vote for me! You can click on the link at the top of the sidebar or go HERE, click on the image, and vote. You do have to register (it's a quick process), but if you have already registered, you can simply log in. Thank you so much!

Thank you for stopping by and thank you for the support! Have a great week.


Supplies
Cardstock: (white) PTI); (blue) Bazzill; (aqua glitterstock) The Paper Studio/Hobby Lobby
Clear stamps: (circle from Circle Friends) Simon Says Stamp
Digital stamp: (frame around sentiment from Nautical Chic brushes) Rhonna Designs
Pigment ink: (Grass) Fresh Ink; (Sunflower Yellow, Pearlescent Sky Blue Brilliance Inks) Tsukineko
Twine: (Caribbean) The Twinery
Dies: (star from Holiday Shapes) Simon Says Stamp; (Small Circle) Spellbinders
Font: (Bell MT, Jenna Sue)

Monday, June 3, 2013

Just Like Bacon...

Hi everyone! I'm excited (and a pretty nervous) to share my card for the Paper Crafts Magazine's Gallery Idol Round 2. The card from Round 1 can be found HERE. I've seen the other entries for this round, and wowee! I'm humbled to be in the Top 20!


On Friday, when I found out the theme, my head was so scattered about how to make a card for defining dad.  I came up with five or six ideas, made a card for one, and decided it wasn't right. I went back to the proverbial drawing board. After flipping through my files, I ran across a digital journaling card from Echo Park with a sentiment. I used the inspiration to make this card:


When I started this card, I had the sentiment in mind and knew I could use one of the bacon stamps from Sizzle On. After playing around with the elements, I couldn't figure out how to get them to work together. Then it hit me to make a rescue plane--I know my dad has come to the rescue on several occasions. ;)

I stamped and colored the plane from Unity and the bacon stamp. After fussy cutting and Xacto-ing the plane, I pinched the stamped banner lines together to turn the bacon into a banner. The bacon should have been flush with the bar, but since it didn't look quite right, I let it trail behind. Here's a close-up:


Yes, I was holding my breath while cutting out the plane and banner! Ha ha

Once I had the plane done, I created a scene in Photoshop. I started with digital patterned paper from the Seafoam collection, and adjusted the hue and the lightness. For the clouds, I recolored and reshaped them, and then layered them on the digital paper. It was a fun way to make my own background paper.

As part of the Gallery Idol contest, there's a vote for the Top 15. If you like my card, I would really appreciate it if you voted for me! You can click on the link at the top of the sidebar or go HERE, click on the image, and vote. You do have to register, but you won't get spammed or anything. :) Thank you so much!!

Thank you for stopping by and thank you for your support! Have a great week.


Supplies
Cardstock: (white) PTI
Other paper: (Premium Matte Photo Paper) OfficeMax
Rubber stamps: (plane from A Little Destination) Unity Stamp Co.
Clear stamps: (bacon from Sizzle On) Kelly Purkey for Simon Says Stamp
Digital elements: (blue paper from the Seafoam collection) ACDigitals.com
Copic markers
Font: (Champagne and Limousines) Dafont.com 

Sunday, June 2, 2013

Yippee!

Hi everyone! Just a quick post to share some good news.


I made it to the Top 20 of Paper Crafts Magazine's Gallery Idol contest. Yeah!!! On Thursday night, I pulled up the Paper Crafts Connection website on my phone and had it ready to go for Friday morning. As soon as I woke up, I checked my phone, and then had to contain my excitement so I didn't wake up my kids. Yeah, it didn't work--I woke up my son. :)

So....here's the card:


It was one of those never-ending cards that I worked on a few minutes here and a few minutes there over several days. The circles are die-cut tissue paper, and I added a few die-cut stars and sequins. For the sentiment, the "Magical" is a digital sentiment from Robyn Meierotto, and I added the rest of the text.

As part of the contest, I'll be sharing my Round 2 card tomorrow and asking for your vote. Eek! I'm excited and nervous about it. :)

Thanks for stopping by! Have a great week.


Supplies
Cardstock: (True Black, white) PTI; (silver glitter cardstock) Doodlebug Designs
Digital stamp: (magical from Little Dreamer set) Robyn Meierotto
Dies: (circles from Moves and Shakers Spinner Die Set) PTI; (stars from Holiday Shapes) Simon Says Stamp
Sequins: Avery Elle

Wednesday, May 29, 2013

Hot Dog!

Hi everyone! I hope your week is going well! I have a new blog design, thanks to Designer Blogs. I decided the winter colors had to go, and I wanted something cheerful.

I was thinking about ideas for the Paper Crafts Magazine's Gallery Idol contest, and since the theme was kid/teen birthday, I asked my seven-year-old what she would like. Cute animals, pink, glitter... So, here's what happened:


The style is a little different for me...more coloring, more fussy-cutting. But, it still is a hybrid card. ;) I used a digital stamp from the Flying High set at Tiddly Winks and colored it with Copics. I'm not going to lie--it took me three tries to get the shading I wanted on the balloons.

I knew I wanted to have the balloons hanging over the edge, so (holding my breath and praying that I didn't have to start again), I cut him out. Here's a close-up:


For the background, I die-cut some clouds from WPlus9 to use as a mask and misted over them with several different mists. The sky is a subtle gradient (I misted from the top of the panel).

When I was done with the card, I got a double thumbs-up from my kids. :)

Thanks so much for stopping by! Have a great rest of the week!


Supplies
Cardstock: (white) PTI
Digital stamp: (dog from Flying High) Tiddly Inks
Copic Markers
Dies: (clouds) WPlus9
Mists: (Dewey) Studio Calico; (Dandelion) Fireworks; (Iridescent Gold) Tattered Angels; (Baby Blue Eyes, Marigold Yellow Orange) Lindy's Stamp Gange
Font: (MTF You Are) SugarHill Co.

Friday, May 10, 2013

350 Cards and Gifts Blog Hop

Hi everyone! Today I'm participating in the Paper Crafts Magazine's 350 Cards and Gifts blog hop. (yeah!) This is one of my favorite issues--there are so many great project ideas!


You can start at the beginning of the hop HERE, and if you get lost along the way, here is the order:


Jocelyn Olson <--You're here


It's such an honor to be participating with these awesome papercrafters! Holly asked us to make a birthday project. I don't know what came over me, but I couldn't stop with just one project. I made a mini ensemble for a fox birthday party:


I have a mild obsession with all kinds of animal prints (foxes, horses, whales), which, lucky for me, are pretty popular right now. It all started with the fox cupcake wrap. And then I figured, if you're eating a cupcake, you need something to drink, right?


I cut the Fox Cupcake Wrapper using my Cameo and finished it off with a black enamel dot for his nose. For the mini mason jar, I created the label using the Crazy for You digital papers and elements. I simply printed and die cut the papers, and I fussy cut the fox.

Next, I made a sneaky treat container for the party. It looks like a tree centerpiece, but it's really a candy container:


I die cut the 3D Gift Box-Basic, and after it was assembled, I added candy inside. The trunk looks like a stake to me. I suppose if someone else was removing the candy, you could poke him or her with it. hee hee

Finally, I made a pillow box and tag for the party favor:


I started off by die cutting the pillow box and adding some woodgrain paper and twine. For the tags, I used the same digital papers as the mason jar and pieced the papers and sentiment strip together. I die cut the papers using the Tag Scallop Die from Paper Smooches. I *had* to make both a boy and a girl fox tag.

There are fab ideas for other treat wraps in the 350 Cards and Gifts issue. Want to win a copy? You can leave a comment here and leave comments on each of the hop participants' blogs. Please comment by 9pm CST on Tuesday, May 14th. Or, if you can't wait another day, you can buy the issue HERE.

If you make your own bag/tag/wrap/gift, be sure to enter it into the Moxie Fab World challenges going on right now.

Thanks so much for stopping by! Next up is the sweet and talented Kalyn.


Supplies
Cupcake Wrapper
Cardstock: (Tangy Orange) Stamp School; (white, True Black) PTI
Die cutting file: (Fox Cupcake Wrapper) Silhouette Online Store
Embellishments: (black enamel dot) My Mind's Eye

Mason Jar
Patterned paper: (green polka dot from Collectable-Remarkable collection) My Mind's Eye
Other papers: (Premium Matte Photo Paper) Office Max
Digital elements: (digital papers and fox from Crazy for You Papers and Elements) One Little Bird at The Lilypad
Dies: (Limitless Layers) PTI
Other: (red and white straw) Simon Says Stamp

Tree Candy Box
Cardstock: (Dark Chocolate) PTI
Patterned paper: (green polka dot from Collectable-Remarkable collection) My Mind's Eye
Die cutting file: (3D Gift Box Basic) Silhouette Online Store

Pillow Box and Tag

Cardstock: (Kraft) PTI
Patterned paper: (woodgrain from Winter Wonderland) Studio Calico
Other papers: (Premium Matte Photo Paper) Office Max
Digital elements: (digital papers and fox from Crazy for You Papers and Elements) One Little Bird at The Lilypad
Die: (Tag Scallop Die) Paper Smooches
Font: (Ostrich Sans Rounded)

Friday, March 15, 2013

Card Creations Winner

Hi everyone! Just a quick post to announce the winner of the Paper Crafts Magazine's Card Creations blog hop. Thank you *so* much for your comments...it's very humbling. :)


I still haven't figured out how to do a screen shot on my new computer, so bear with me. The winner is:


Emily H said...
So gorgeous!! Thanks for the tutorial!

Emily, you've won a copy of Card Creations. Yeah! I'll send you a message.


Have a great weekend!

Friday, March 8, 2013

Card Creations Blog Hop

Hi everyone! I'm part of the Paper Crafts Magazine's Card Creations' Blog Hop (eek!).


If you're joining the hop, you should be coming from Angeline's blog. If you want to start at the beginning, here's the order:


Jocelyn Olson <--You're here.


As part of our hop, we're all using one of the free digital sentiments you can find HERE. I picked the "Thank You" sentiment and made this card:


I started out with some white distressed digital patterned paper (yes, it really is patterned paper, ha ha) from Mommyish and added the folk wreath. 

For the sentiment, I first turned it into a digital brush. Once I had the brush, I stamped it on the page and then colored it with a mist digital brush to create an ombre effect. Here's a close-up of the ombre:


Speaking of ombre, did you see the Ombre Challenge over at Moxie Fab World? I'm actually linking up before the last second (it's a miracle!). 

I've been stuck in Washington, DC a couple of extra days this week, and since I couldn't do much crafting, I decided to make a quick video instead. In the video, I showed how to turn the sentiment into a digital brush. The details in the video are a little clearer in HD on YouTube. 


It's my first posted video--please don't be too harsh! :) 

As part of the hop, we're each giving away a copy of  Card Creations. All you have to do is comment here before 11:59 CST Tuesday, March 12th. To increase your chances to win, be sure to check out the other ladies' blogs.  If you can't wait, you can buy a copy of Card Creations HERE. ;)

Next up is one of my favorite blog friends, Kalyn. 

Have a great weekend!


Supplies
Cardstock: (white) Papertrey Ink
Other paper: (Premium Matte Photo Paper) Office Max
Digital elements: (sentiment from Card Creations v11 downloads) Paper Crafts Magazine; (white digital patterned paper from Geek Chic) Mommyish; (wreath from In Good Company) Pixels and Company
Fibers: (red satin ribbon) Paper Source

Blog Design by Caked Designs