Hi everyone! I hope you're having a great week! We've been busy at home helping our daughter with school projects. She has to do a presentation on Argentina. Most kids are doing PowerPoint presentations (second grade, already??), but she chose to make comic strips. ha ha Yep, totally my kid!
I'm on the Glitz Design blog today for One Buck Wednesday. This week, there are two Glitz deals at Jessica Sprague--the Vintage Blue paper pack and the Vintage Blue element pack. These papers have such pretty shades of blue and gold.
Here's what I made:
I started with the bird/music layering paper from Vintage Blue and added the "LOVE" element over it. I simply printed the paper in the background, stitched, and inked the edges.
I thought the center panel seemed a little too plain, so I added a glue border and rolled it in gold glitter. I wasn't going for a perfect border (yeah, that's my story and I'm sticking to it). Here's a close-up:
If you'd like to buy the Vintage Blue (on sale today only!), head over to digital store. You can also see the rest of the digital DT's projects on the Glitz blog.
Have a great day! Thanks for stopping by!
Supplies
Cardstock: (Kraft) PTI
Digital element: (bird/music, sentiment from Vintage Blue element pack; patterned paper from Vintage Blue paper pack) Glitz Design
Glitter: (gold) Martha Stewart
Ribbon: (sheer navy) May Arts
Button: Bazzill
Showing posts with label Glitz Designs. Show all posts
Wednesday, October 9, 2013
Saturday, October 5, 2013
It's a World Card Making Day Card!
**If you're looking for the Paper Crafts Magazine's WCMD Blog Hop, please click here.
Hi everyone! Happy World Card Making Day! Do you have any crafty plans for today?
There are lots of cool things going on, one of which is the Paper Crafts Magazine's Blog Tour. I made a card last week for Glitz Designs, and it was posted on their blog, but I thought I would share it on my blog today:
It's an all-Glitz card, specifically the digital Finnley kit. I started by duplicating the yellow circles, which are their digital giant rhinestones. After that, I resized and printed the sentiment, flower cluster from the Finnley Element Pack 2, and three different papers from the Finnley Paper Pack.
After I fussy cut the flowers, I layered them over some papers. I hand-cut the papers--I intentionally wanted them a little wonky. Here's a close-up:
I love those flowers! Since they are digital, it would be pretty easy to mass-produce these cards. Gotta love that. :)
Have a great WCMD! Thanks for stopping by!
Supplies
Cardstock: (white) PTI; (Premium Matte Photo Paper) OfficeMax
Digital elements: (papers, rhinestones, sentiment, flowers from Finnley kit) Glitz Designs at JessicaSprague.com--or, you can find them in paper format HERE.
Staples: (Tiny Attacher) Ranger
Hi everyone! Happy World Card Making Day! Do you have any crafty plans for today?
There are lots of cool things going on, one of which is the Paper Crafts Magazine's Blog Tour. I made a card last week for Glitz Designs, and it was posted on their blog, but I thought I would share it on my blog today:
It's an all-Glitz card, specifically the digital Finnley kit. I started by duplicating the yellow circles, which are their digital giant rhinestones. After that, I resized and printed the sentiment, flower cluster from the Finnley Element Pack 2, and three different papers from the Finnley Paper Pack.
After I fussy cut the flowers, I layered them over some papers. I hand-cut the papers--I intentionally wanted them a little wonky. Here's a close-up:
I love those flowers! Since they are digital, it would be pretty easy to mass-produce these cards. Gotta love that. :)
Have a great WCMD! Thanks for stopping by!
Supplies
Cardstock: (white) PTI; (Premium Matte Photo Paper) OfficeMax
Digital elements: (papers, rhinestones, sentiment, flowers from Finnley kit) Glitz Designs at JessicaSprague.com--or, you can find them in paper format HERE.
Staples: (Tiny Attacher) Ranger
Friday, September 27, 2013
Wild & Free Blog Hop
Hi everyone! Today, the Glitz Digital Team is having a blog hop!
We're showing projects using the new Wild and Free collection. Here's the line-up for today's hop:
Okay, if you haven't seen the Wild & Free collection yet, you *need* to check it out. Seriously. The kit has so many great elements and papers--there are tons of possibilities!
I'm sharing two hybrid cards. First up:
For this CAS card, I simply resized the fab Wild & Free patterned paper for the background. I recolored the background of the "wander" sentiment from Wild & Free Element Pack 1 to layer on the white background. There are several sentiment in the kit that would work well for this same design. :)
Here's a close-up:
*sigh* Isn't that paper gorgeous?
For my next card, I did more layering:
The "LOVE" journaling card started out white with an ombre (top right in the picture below):
First, I printed the pink and yellow Wild and Free paper. Then, I recolored the journaling card black and white in Photoshop to increase the contrast. Finally, I traced the image on my Cameo and die-cut it.
For the layering, I added some papers from the collection and hand-cut tissue paper for the edge. I also added a little splatter in the background with some mists. Here's a close-up:
Want to win the full digital collection? Just leave a comment, and comment along the way to increase your chances! Or, you can buy the Wild and Free kit at Jessica Sprague HERE. :) It's such a beautiful collection!
The next stop on the hop is the super-talented Kym! Thanks for stopping by!
Supplies
Wander
Cardstock: (blue) Stampin' Up
Other paper: (Premium Matte Photo Paper) OfficeMax
Digital elements: (paper from Wild & Free Paper Pack; sentiment from Wild & Free Element Pack 1) Glitz Designs
LOVE
Cardstock: (White Woodgrain) Simon Says Stamp
Other paper: (Premium Matte Photo Paper) OfficeMax
Digital elements: (papers from Wild & Free Paper Pack; journaling card from Wild & Free Element Pack 1) Glitz Designs
Mists: (Pink Guava) Maya Mists; (Dandelion Fireworks) Tsukineko
Twine: Lawn Fawn
Silhouette Cameo
We're showing projects using the new Wild and Free collection. Here's the line-up for today's hop:
Jocelyn Olson <--You are here!
Okay, if you haven't seen the Wild & Free collection yet, you *need* to check it out. Seriously. The kit has so many great elements and papers--there are tons of possibilities!
I'm sharing two hybrid cards. First up:
For this CAS card, I simply resized the fab Wild & Free patterned paper for the background. I recolored the background of the "wander" sentiment from Wild & Free Element Pack 1 to layer on the white background. There are several sentiment in the kit that would work well for this same design. :)
Here's a close-up:
*sigh* Isn't that paper gorgeous?
For my next card, I did more layering:
The "LOVE" journaling card started out white with an ombre (top right in the picture below):
First, I printed the pink and yellow Wild and Free paper. Then, I recolored the journaling card black and white in Photoshop to increase the contrast. Finally, I traced the image on my Cameo and die-cut it.
For the layering, I added some papers from the collection and hand-cut tissue paper for the edge. I also added a little splatter in the background with some mists. Here's a close-up:
Want to win the full digital collection? Just leave a comment, and comment along the way to increase your chances! Or, you can buy the Wild and Free kit at Jessica Sprague HERE. :) It's such a beautiful collection!
The next stop on the hop is the super-talented Kym! Thanks for stopping by!
Supplies
Wander
Cardstock: (blue) Stampin' Up
Other paper: (Premium Matte Photo Paper) OfficeMax
Digital elements: (paper from Wild & Free Paper Pack; sentiment from Wild & Free Element Pack 1) Glitz Designs
LOVE
Cardstock: (White Woodgrain) Simon Says Stamp
Other paper: (Premium Matte Photo Paper) OfficeMax
Digital elements: (papers from Wild & Free Paper Pack; journaling card from Wild & Free Element Pack 1) Glitz Designs
Mists: (Pink Guava) Maya Mists; (Dandelion Fireworks) Tsukineko
Twine: Lawn Fawn
Silhouette Cameo
Wednesday, September 18, 2013
Happy Travels Note Card Kit
Hi everyone! I hope you're having a great week!
The Glitz Digital team is sharing projects on the Glitz blog today using the Happy Travels collection. The papers and element packs are part of the One Buck Wednesday at Jessica Sprague today. :)
I found THIS note card set on the Silhouette blog, and I decided to do something similar using the digital papers:
I know I'm always looking for ideas for paper crafted gifts, and I thought all of these items would work as a note card kit. There are the cards, envelopes, vellum confetti, and seals for the envelope.
Here's what the cards look like:
I say "cards," but I actually lazed out and only made two cards. ;) I started by re-szing two of the digital papers from the Happy Travels Paper Kit. I fussy cut one of the airplanes from the patterned paper. Isn't that plane fun? I used a cloud from Simon Says Stamp and backed it with the other patterned paper. The cute sentiment is from the Up and Away stamp set.
For the background, I stamped the Hero Arts Tweed in white. I love the subtle texture! Here's a close-up:
I also made envelopes:
I used the same airplane paper as the card and printed on the polka dot patterned paper on the backside. I love that with digital, I can put whatever patterns I want together for double-sided papers.
The Happy Travels Element Kit has a cool series of vintage travel posters. I'm thinking about printing a few and framing them for my son's room. I did the opposite here, and shrunk them:
After printing and trimming the images, I stitched them together to make a banner. I thought that with the note card kit, you could trim off whichever image you wanted and use it as a seal on the envelope. It would also make a cute banner. :)
Lastly, I made confetti for the note cards:
I printed two of the digital papers on vellum. As a tip, I always use the "glossy paper" option when I print on vellum. I die-cut planes and hearts out of the papers.
Phew! That was a lot of pictures. If you're still with me, I wanted to mention again if you like the Happy Travels papers and elements, they're on sale $1 and $1.50 today only. Score! You can find them HERE.
You can see my project and other samples from the team on the Glitz blog. :)
Have a great day! Thank you so much for stopping by!
Supplies
Cardstock: (Rustic White) PTI
Other paper: (Premium Matte Photo Paper) OfficeMax
Digital elements: (all papers and travel posters from Happy Travels Paper Kit and Element Kit) Glitz Designs
Rubber stamps: (Tweed Background) Hero Arts
Clear stamps: (card sentiment from Up and Away) Mama Elephant
Ink: (Real Red) Stampin' Up; (White) WPlus9
Dies: (large heart from Large Holiday Shapes; small hearts from Mini Hearts Set; planes from Small Planes; clouds from Flat Bottom Clouds) Simon Says Stamp
Tool: (Envelope Punch Board) We R Memory Keepers
The Glitz Digital team is sharing projects on the Glitz blog today using the Happy Travels collection. The papers and element packs are part of the One Buck Wednesday at Jessica Sprague today. :)
I found THIS note card set on the Silhouette blog, and I decided to do something similar using the digital papers:
I know I'm always looking for ideas for paper crafted gifts, and I thought all of these items would work as a note card kit. There are the cards, envelopes, vellum confetti, and seals for the envelope.
Here's what the cards look like:
I say "cards," but I actually lazed out and only made two cards. ;) I started by re-szing two of the digital papers from the Happy Travels Paper Kit. I fussy cut one of the airplanes from the patterned paper. Isn't that plane fun? I used a cloud from Simon Says Stamp and backed it with the other patterned paper. The cute sentiment is from the Up and Away stamp set.
For the background, I stamped the Hero Arts Tweed in white. I love the subtle texture! Here's a close-up:
I also made envelopes:
I used the same airplane paper as the card and printed on the polka dot patterned paper on the backside. I love that with digital, I can put whatever patterns I want together for double-sided papers.
The Happy Travels Element Kit has a cool series of vintage travel posters. I'm thinking about printing a few and framing them for my son's room. I did the opposite here, and shrunk them:
After printing and trimming the images, I stitched them together to make a banner. I thought that with the note card kit, you could trim off whichever image you wanted and use it as a seal on the envelope. It would also make a cute banner. :)
Lastly, I made confetti for the note cards:
I printed two of the digital papers on vellum. As a tip, I always use the "glossy paper" option when I print on vellum. I die-cut planes and hearts out of the papers.
Phew! That was a lot of pictures. If you're still with me, I wanted to mention again if you like the Happy Travels papers and elements, they're on sale $1 and $1.50 today only. Score! You can find them HERE.
You can see my project and other samples from the team on the Glitz blog. :)
Have a great day! Thank you so much for stopping by!
Supplies
Cardstock: (Rustic White) PTI
Other paper: (Premium Matte Photo Paper) OfficeMax
Digital elements: (all papers and travel posters from Happy Travels Paper Kit and Element Kit) Glitz Designs
Rubber stamps: (Tweed Background) Hero Arts
Clear stamps: (card sentiment from Up and Away) Mama Elephant
Ink: (Real Red) Stampin' Up; (White) WPlus9
Dies: (large heart from Large Holiday Shapes; small hearts from Mini Hearts Set; planes from Small Planes; clouds from Flat Bottom Clouds) Simon Says Stamp
Tool: (Envelope Punch Board) We R Memory Keepers
Thursday, September 12, 2013
The Raven
Hi everyone! This is my second post of the day. If you're looking for my Newton's Nook Designs post, please click HERE.
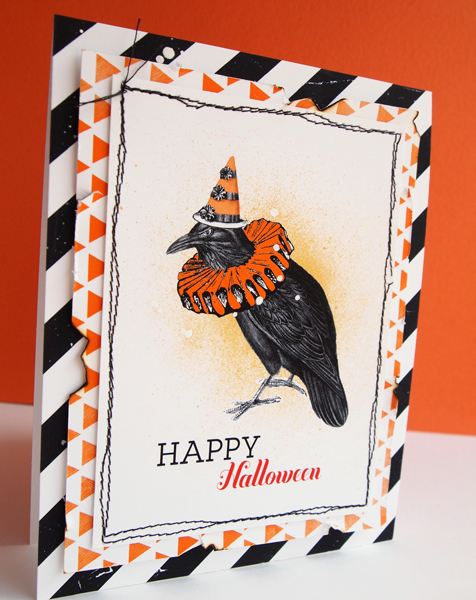
This week, the Glitz Digital Team is sharing projects with inks, pains, and mists. I'm up on the Glitz blog today with a project using the new Raven collection:
Okay, first of all, can I say how much I love this collection? I'm a big fan of Halloween papers, and this collection is probably my favorite. Ever. The papers are Halloween-ish, but they could be used for any season (like the papers I used here).
I started with the raven image from the Element Pack 1 and sprayed a digital mist behind him. Then, I used a digital brush from the same Elements and stamped it twice to off-set the sentiment. Once I was done printing the image, I splattered some Mister Hueys over the image. Here's a close-up:
For the Raven papers, I splattered some mist on the stripe, but I thought the triangle paper could use something extra...
I've never lit paper on fire (for a card), but I decided to try it. I used photo paper, which seemed to slow the burn time, and it gave the edges just the right distressing. Strangely, my husband didn't even question why I was standing over the sink lighting the paper with a lighter. ha ha
Supplies
Cardstock: (white) PTI
Digital elements: (stripe paper from Raven Paper Pack; triangle from Raven Elements Pack 2; sentiment and raven from Elements Pack 1) Glitz Designs at Jessica Sprague.com
Mist: (Opaque White) Mister Huey's
This week, the Glitz Digital Team is sharing projects with inks, pains, and mists. I'm up on the Glitz blog today with a project using the new Raven collection:
I started with the raven image from the Element Pack 1 and sprayed a digital mist behind him. Then, I used a digital brush from the same Elements and stamped it twice to off-set the sentiment. Once I was done printing the image, I splattered some Mister Hueys over the image. Here's a close-up:
For the Raven papers, I splattered some mist on the stripe, but I thought the triangle paper could use something extra...
I've never lit paper on fire (for a card), but I decided to try it. I used photo paper, which seemed to slow the burn time, and it gave the edges just the right distressing. Strangely, my husband didn't even question why I was standing over the sink lighting the paper with a lighter. ha ha
Thanks so much for stopping by my blog! Have a great weekend!
Supplies
Cardstock: (white) PTI
Digital elements: (stripe paper from Raven Paper Pack; triangle from Raven Elements Pack 2; sentiment and raven from Elements Pack 1) Glitz Designs at Jessica Sprague.com
Mist: (Opaque White) Mister Huey's
Wednesday, September 4, 2013
Yours Truly
Hi everyone! Last week it was announced that I'm joining the new Glitz Designs Digital Design Team. I have been grinning ear-to-ear about it...I love Glitz, I love digital. It's just awesome.
So, what does being on the team mean? I'll be sharing the digital sets over at Jessica Sprague. It also means trying to keep up with the super talented design team members (I've been seeing their layouts--whoa! I've got to say, it's a little intimidating!)
This week on the Glitz blog, we're sharing projects using the Yours Truly collection. I made a couple of cards. I went ultra-CAS for the first one:
I used a digital journaling card from the Yours Truly Embellishments #2 and simply enlarged it. I wanted to do a little something extra, so I took scraps from Embellishments #1 (the yellow zigzag is part of a Polaroid frame) and the Paper Pack to frame the sentiment. Super easy! It was so quick and easy, I made three more for a card set. :)
Here's a close-up:
For my second card, I used the same three kits to make a more layered card:
For this card, I resized, printed, and layered papers and the Polaroid frame. *sigh* I love these papers. I wish I could wallpaper my house in that navy blue. ;)
For the ephemera, I recolored the text to make it more of a focal point. Here is a close-up:
Did I mention that the Yours Truly Embellishments #1 and Paper Pack are on sale for a $1 and $2. Seriously? What a deal! The sale is for today (Wednesday) only. You can follow the links above to find them.
You can check out my cards and the rest of the DT over on the Glitz blog. It would be great if you would leave some love over there. :)
Last week, I had a two-part giveaway. The winner of the first giveaway is:
The winner of the second giveaway is:
Thank you so much for your comments! Shelly and Richard, I'll be contacting you or you can e-mail me at redballooncards at yahoo dot com.
Have a great day!
Supplies
What You Bring
Cardstock: (white) PTI
Other paper: (Premium White Photo Paper) OfficeMax
Digital elements: (journaling card from Yours Truly Embellishments #2; navy and red papers from Yours Truly Paper Pack; yellow zigzag frame from Yours Truly Embellishments #1) Glitz Designs
Whatever You Are
Cardstock: (White Woodgrain) Simon Says Stamp
Digital elements: (girl ephemera from Yours Truly Embellishments #2; navy, grey, and red papers from Yours Truly Paper Pack; yellow zigzag frame from Yours Truly Embellishments #1) Glitz Designs
Ink: (Dandelion Fireworks) Tsukineko
Embellishments: (sequin) Hobby Lobby; (red transparency from Fact or Fiction) BasicGrey; (wood veneer star) Studio Calico
Marker: (Y13) Copic
Twine: (red) Divine Twine
So, what does being on the team mean? I'll be sharing the digital sets over at Jessica Sprague. It also means trying to keep up with the super talented design team members (I've been seeing their layouts--whoa! I've got to say, it's a little intimidating!)
This week on the Glitz blog, we're sharing projects using the Yours Truly collection. I made a couple of cards. I went ultra-CAS for the first one:
I used a digital journaling card from the Yours Truly Embellishments #2 and simply enlarged it. I wanted to do a little something extra, so I took scraps from Embellishments #1 (the yellow zigzag is part of a Polaroid frame) and the Paper Pack to frame the sentiment. Super easy! It was so quick and easy, I made three more for a card set. :)
Here's a close-up:
For my second card, I used the same three kits to make a more layered card:
For this card, I resized, printed, and layered papers and the Polaroid frame. *sigh* I love these papers. I wish I could wallpaper my house in that navy blue. ;)
For the ephemera, I recolored the text to make it more of a focal point. Here is a close-up:
Did I mention that the Yours Truly Embellishments #1 and Paper Pack are on sale for a $1 and $2. Seriously? What a deal! The sale is for today (Wednesday) only. You can follow the links above to find them.
You can check out my cards and the rest of the DT over on the Glitz blog. It would be great if you would leave some love over there. :)
Last week, I had a two-part giveaway. The winner of the first giveaway is:
The winner of the second giveaway is:
Thank you so much for your comments! Shelly and Richard, I'll be contacting you or you can e-mail me at redballooncards at yahoo dot com.
Have a great day!
Supplies
What You Bring
Cardstock: (white) PTI
Other paper: (Premium White Photo Paper) OfficeMax
Digital elements: (journaling card from Yours Truly Embellishments #2; navy and red papers from Yours Truly Paper Pack; yellow zigzag frame from Yours Truly Embellishments #1) Glitz Designs
Whatever You Are
Cardstock: (White Woodgrain) Simon Says Stamp
Digital elements: (girl ephemera from Yours Truly Embellishments #2; navy, grey, and red papers from Yours Truly Paper Pack; yellow zigzag frame from Yours Truly Embellishments #1) Glitz Designs
Ink: (Dandelion Fireworks) Tsukineko
Embellishments: (sequin) Hobby Lobby; (red transparency from Fact or Fiction) BasicGrey; (wood veneer star) Studio Calico
Marker: (Y13) Copic
Twine: (red) Divine Twine
Subscribe to:
Posts (Atom)